It’s that happy time of year again! Time to pull the cover off of your RV and get it ready for a spring and summer of happy camping. Here’s some key steps for the process known as dewinterizing your RV.
Check all tires
Just like cars and bicycles, inactive RV tires lose significant psi of air pressure each month of inactivity, especially if stored in the cold. Driving an RV with underinflated tires is one of the most unsafe actions an RVer can do, so be sure to give your tires an air pressure and wear and tear check up.
Give it the once over
Do a walk through of all potential water damage spots on your RV’s exterior, especially the roof and hitch. Check the sealant around windows and doors, and look for any cracked seams in the roof caused by snow pile up.
Check your batteries
Using a voltmeter while your RV is disconnected from electricity, check the charge and water level in your battery, then adjust it accordingly.
Flush out the antifreeze
Even if the antifreeze you use is non-toxic, you still don’t want it in your drinking water. Drain your fresh water holding tank entirely, add potable water back in, then turn the water pump and all faucets on, and let the system drain for several minutes. Flush the toilet a few times during this process. When the water comes out clear, close the faucets and the pump. Then, take the water heater off bypass mode, and replace all water filter cartridges that were removed for storing the RV. Make sure to dump your gray and black water tanks at an official dump site, as they are still full of antifreeze.
You will also want to sanitize your water system to remove any mold that built up in storage. After doing so, check for any leaky pipes or plumbing issues.
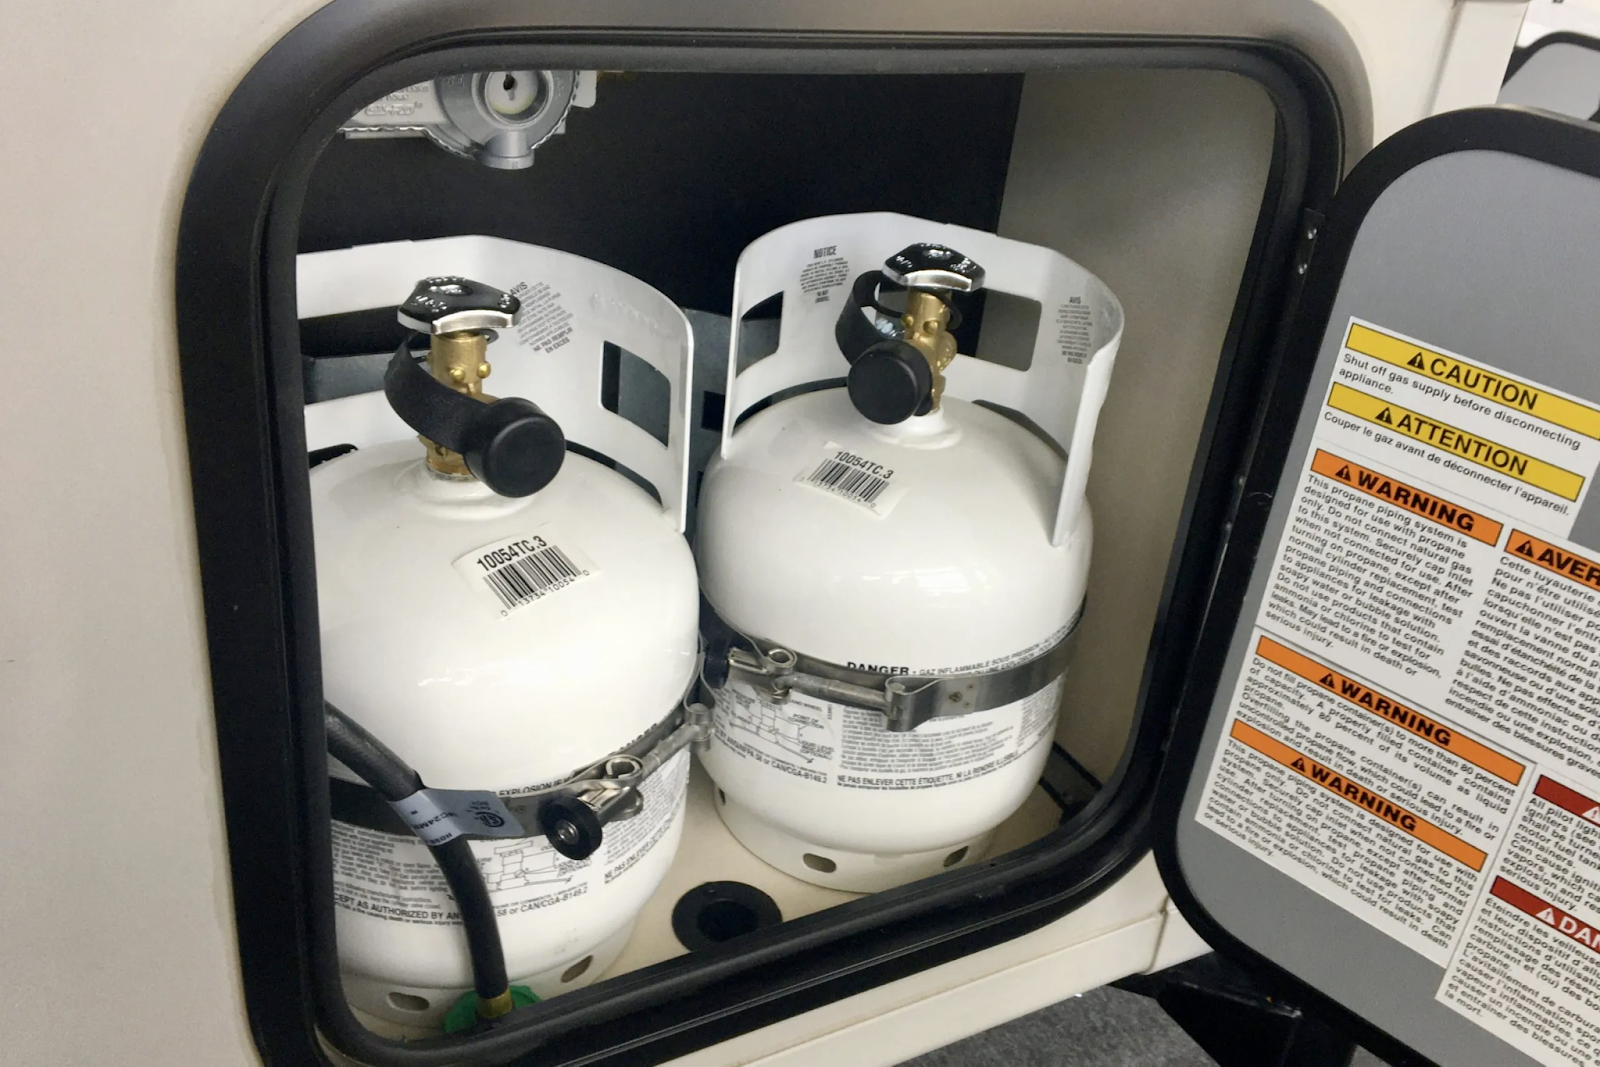
Check your propane
Reinstall all propane tanks and make sure the hose is tightly fitted. Check for potential propane leaks by putting soapy water on all hose connections. If bubbles form, it could indicate a leak. Retighten after the process is complete. Check if your state requires propane tank recertification. Then make sure all of your propane-run appliances are working by giving them a quick test, especially on each stove burner. If you have a generator, check its oil levels.
Freshen your filters
Air and water filters collect lots of dust and mold, so change them out at the beginning of each camping season. Make sure that your air vents are also functional with a good flow of air.
Be safe
Don’t forget to update the smoke alarm batteries, fire extinguisher, carbon monoxide detector, and LP detector. Restock your RV first aid and emergency supplies, get rid of all expired dry food.
After all those important updates, you’re all ready to camp! For more RV tips, tricks, and news, follow our Pete’s RV Center Info Blog today.
The All-Important tanks on the front of your travel trailer might just be the most versatile tool in your RV. Propane lets campers cook, run heat, make hot water, and power appliances, all without needing to connect to electricity. It is frequently recommended that campers who are connected to electricity use propane sparingly.
To maintain your propane tanks, make sure to do the following:
Keep watch of the age of your propane tanks. The manufacturing date is stamped on the tank, and it needs to be replaced or recertified after 12 years.
Turn on your fridge the night before with propane, so it’s cold enough at the start of the camping trip. Switch to electric if you’re going to a campsite with a hookup.
Check the propane flow by “bleeding” the system. Turn on your stove and let the flames burn until they’re blue. This gets the air out of the propane lines, clearing out room for you to turn on other appliances.
If you smell gas, turn off all propane tanks and RV appliances! The strong smell of propane gas indicates a leak, and you’ll need to replace the seal and tank. Do not attempt to repair leaks yourself, as propane is stored in its tank at -44 degrees, which will give you frostbite at the touch.
Keep a working carbon monoxide alarm and propane safety alert inside your RV.
Avoid using propane in a moving vehicle, and always keep your RV well-ventilated when cooking or using propane inside.
For more RV tips, tricks, and news, follow our Pete’s RV Infoblog!
It’s that time of year again: time to dump lots of brightly colored liquid into all of your RV drains. You Need Antifreeze! What do you need to know about it?
RV and Marine antifreeze, conveniently packaged in the same bottle, surprisingly doesn’t protect against freezing, which isn’t necessarily harmful. It’s designed to prevent bursting, the plumbing damage that comes from ice freezing, expanding, and then rupturing. A rupture can result in gallons of pipe water flooding into the RV, causing a headache of damages.
“RV antifreeze rated for -50 F and -75 F will start to freeze at around 20 F, but it won’t freeze to the burst point until -50 F or -75 F respectively.
In parts of the country where temperatures go into minus digits and stay there you should use the -100 F antifreeze for added protection. This type freezes at about -20 F, but provides burst protection to -100 F.” Said girlcamper.com.
The most important part of using antifreeze is draining as much water or waste liquid from the pipes as possible. Antifreeze mixed with diluted water from an undrained pipe will burst far sooner than the temperature estimates on the bottle that assume there’s little to no water in the pipe.
After winter is over, you can fill your pipes without water once again without worrying about draining the antifreeze, which is typically nontoxic. Of all the preparation your RV needs for winter, put antifreeze–and saving your pipes–at the top of the list.
For more tips about winterizing your RV, check out our Winterization Tips with Pete’s RV Guru Randy Murray.
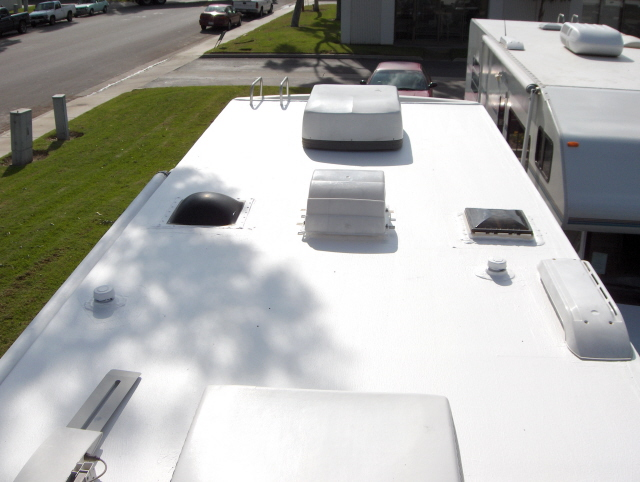
Out of sight, out of mind is not a cliche that should be applied to RV roofs. They should be cleaned several times per year, and inspected for any potential issues.
During cleaning, scrub your RV roof with a medium bristle brush, or any other brush recommended by the manufacturer. You can use a cleaning liquid while doing this, but be sure not to use cleaners made with petroleum solvents, abrasives, or citruses, as those will weaken the strength of the roof materials.
After scrubbing, rinse the whole RV thoroughly, both roof and exterior walls. Any grime dripping off the roof will go down the exterior walls, and if not rinsed, will leave ugly stains.
Inspecting the roof while cleaning is vital, and should be done thoroughly. Check all sealants and seams, skylights, vents, and roof rack for mold and cracks. Fix any rips or tears immediately, before they snowball into other problems.
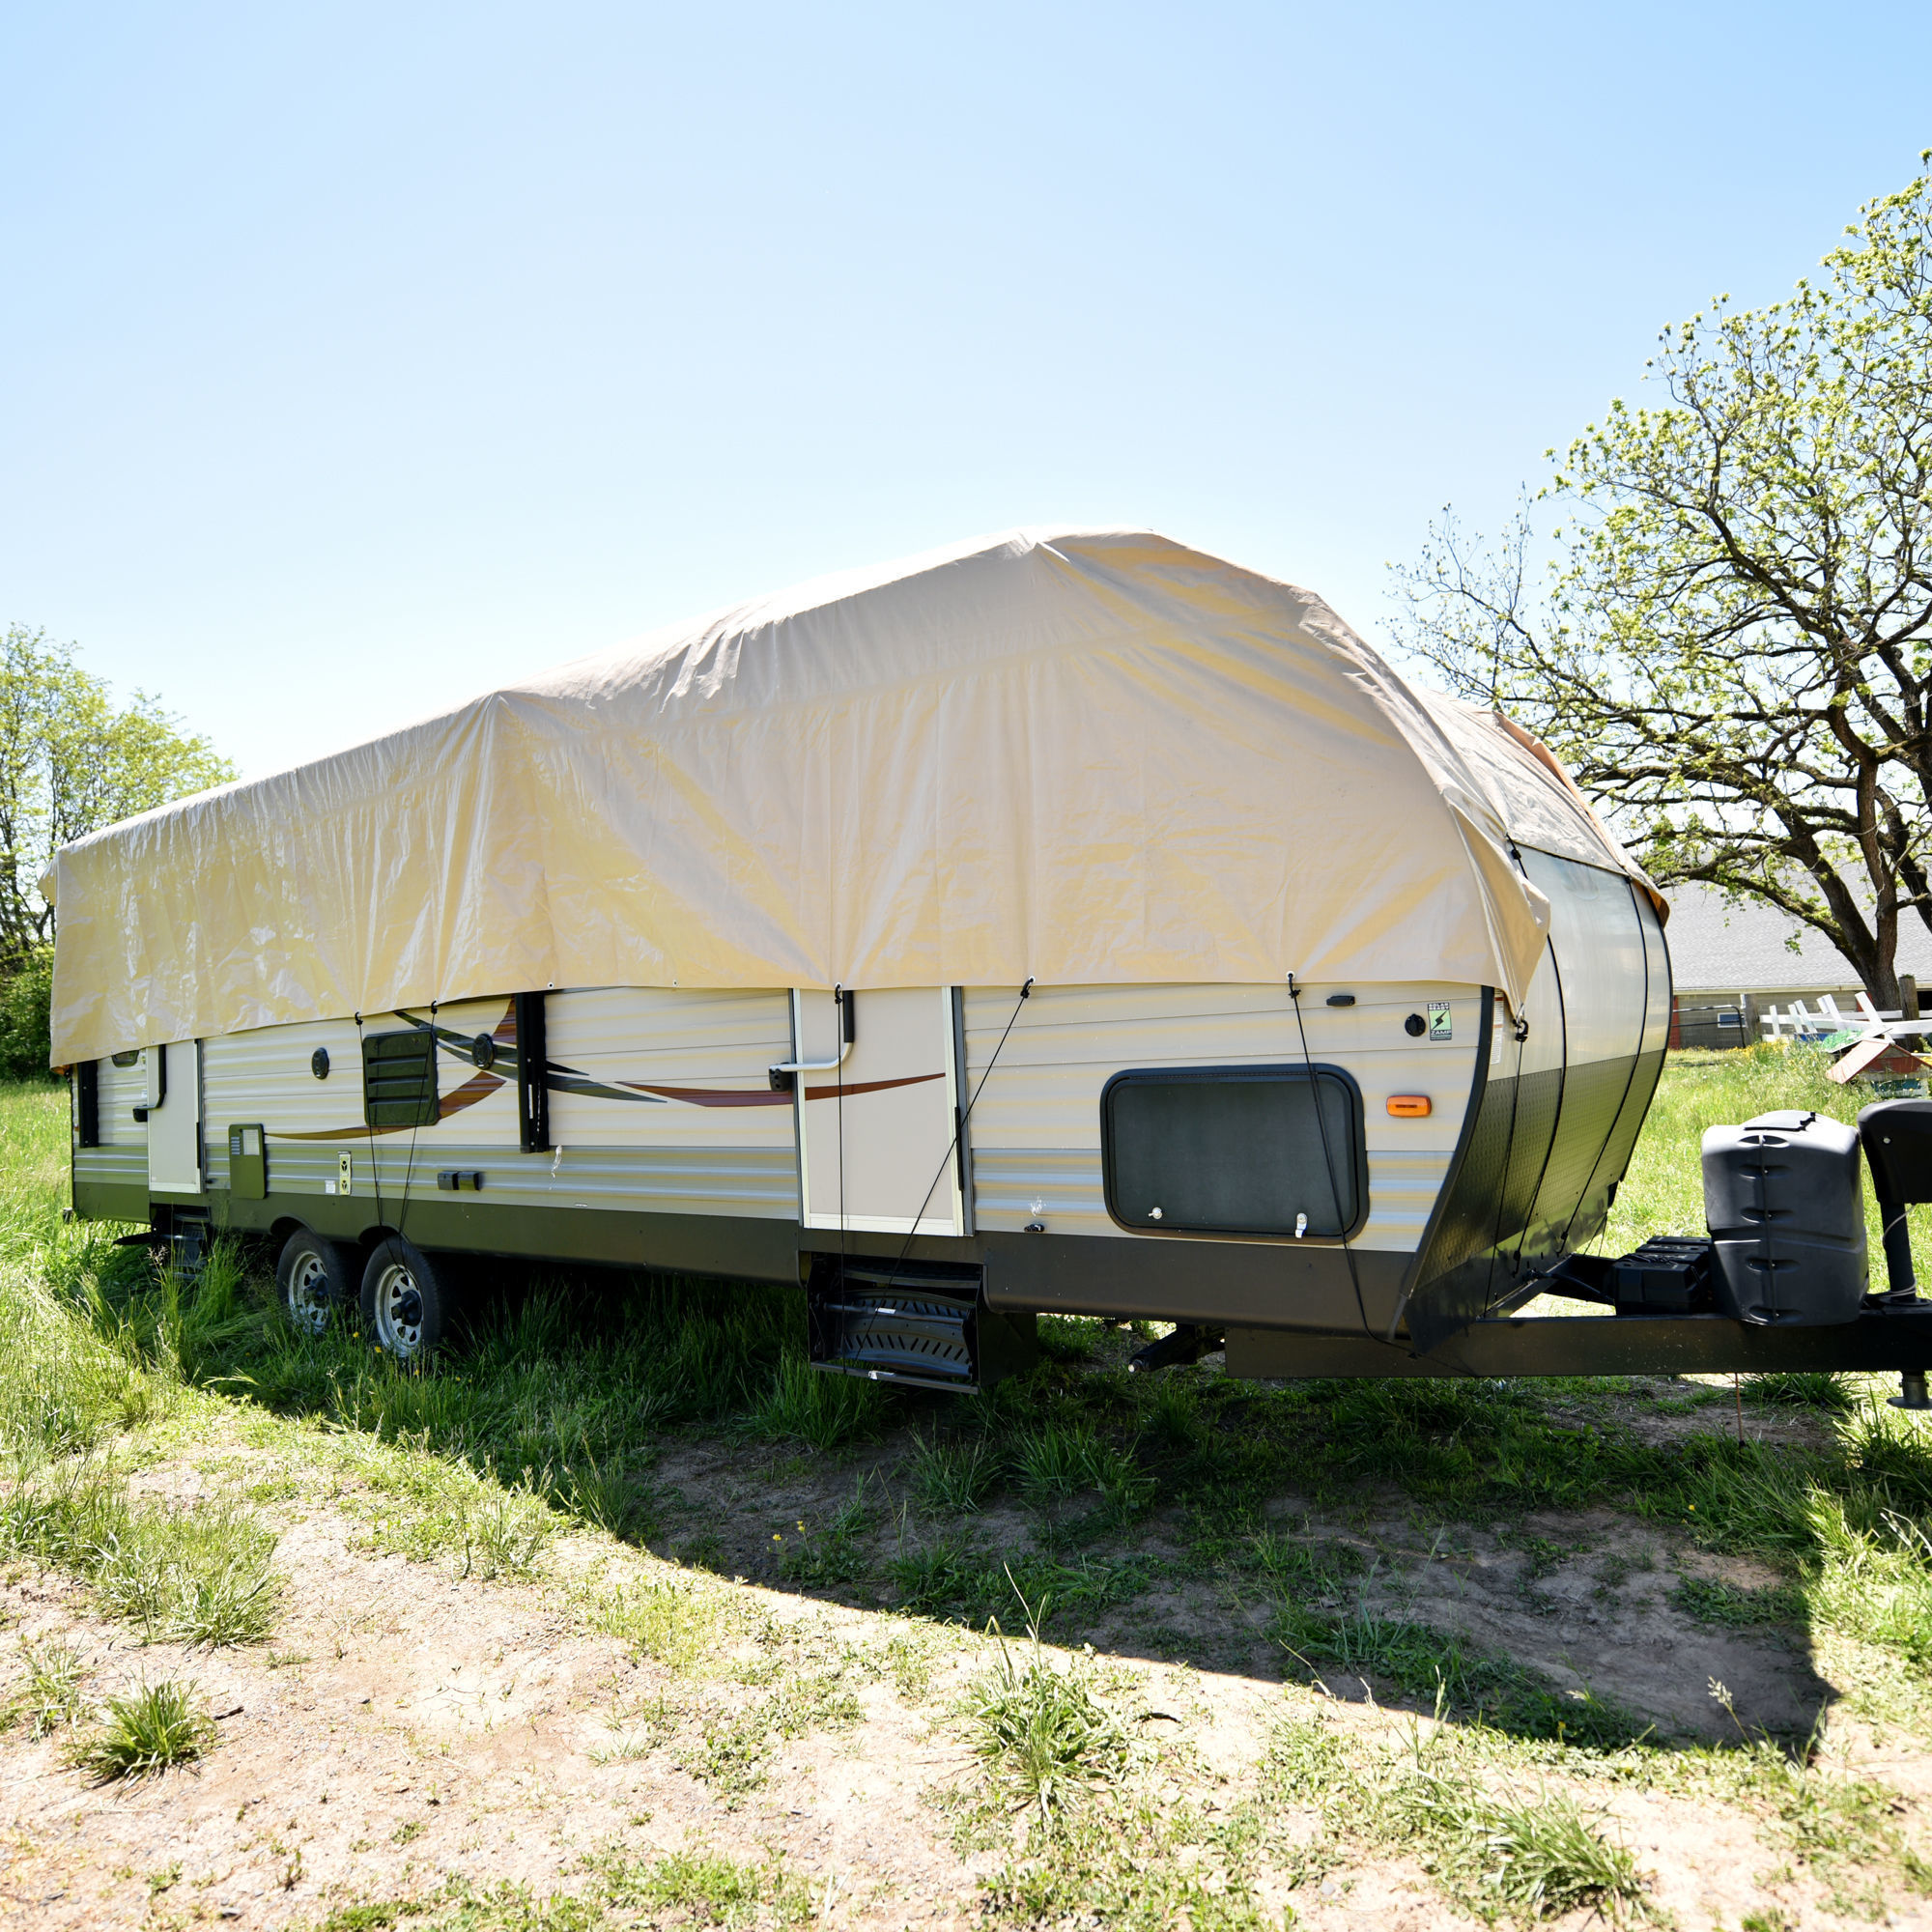
To passively protect your RV roof from weather damage, keep it away from weather, and avoid the sun! RV storage facilities are ideal for protection, but RV roof covers will separate the roof from the elements. Be sure to use a proper RV roof cover and not any other kind of tarp, which can reduce airflow and result in mold.
At Pete’s RV Center, we have all of your RV maintenance needs in mind. Visit us at petesrvcenter.com to find a location near you!
PetesRV.com expert, Randy Murray provides an overview of basic camping essentials and the tools required to make your next trip safe, worry free, and fun!
Video Transcript for “Basic Camping Essentials | Pete’s RV Quick Tips”
Randy: Hey, folks. Randy with Pete’s RV TV here today. Another Quick Tip segment for you. I just want to take a couple minutes and show you some of the things that I bring me … with me when I go camping.
I take a lot of phone calls from customers that have small problems while they’re camping that do arise. and when I direct them on the best way to take care of that problem, they need a couple tools that, they may not have with them. So, if you put together a basic tool kit, when you go camping, leave it right in the camper, no problem whatsoever. We can talk you through most anything.
So, some of the things that I bring with me is, first of all, I always bring some sort of, like, source. Either something I can put on my head, or … This little guy right here in kinda neat. We sell him in the store. It’s got a magnet on the back, so we can stick it to a piece of metal in the camper where I’m working there. It’s got a hook on it and it gives me some light underneath the cabinet or in the front storage compartment or by the battery, cause nothing ever goes wrong in the daylight. It always happens at night, especially if you go camping with me.
So, a couple lights, which are nice to have, or even if you’ve got just a regular flashlight that you store, and keep charge in the camper. Another thing I bring is I’ve got a bag of fuses. So, every fuse … every camper has multiple different size fuses in them. So, I kind of got a bag of … Just, a variety of everything that I run into in a camper and a good thing to have with me. Roll of electrical tape. Never know (laughs) and you can fix most anything with electrical tape, if needed.
I also bring some crimp-connectors, which you can buy in a kit like at, your local, home goods store or something like that. And these are just if I have to re-attach a wire, or we have to shorten something up, or we have a mishap or something pulled loose. Just, to be able to make a crimp connection is nice. That will also work in conjunction with a pair of crimping pliers. And, again, sometimes the kits you purchase will come with an inexpensive pair of pliers that you can use, to get by for the weekend.
Now, most campers are built with, screws, obviously. And the type of screws they use are a square-tip, or a screw had has got a square tip, so you need a special square tip, to go to those screws. And that’s this guy right here, if Josh can pan in on it, and you’ll see I got a Phillips right next to it.
most people have a Phillips, because that’s what we have at home. Campers are a little odd, and they require that square tip. So, this tip that I purchased from, again one of the local box stores. It’s a Milwaukee kit. I think it cost like $20. It’s got everything I need in it. It’s got, screw acceptor for my screw gun. You will need a screw gun as well. and it’s got the square tips, it’s got fill-ups, it’s got a couple torques here, and it’s got spares of all, because if you lose them like I do, nice to have a spare. But anyway, for the cost of this kit, I think it’s just a great kit to (laughs) … I have one at home, and on my carry-around tool box that I do bring with me when I go camping.
Sheet-rock knife, or a box cutter. This one actually folds up like a jackknife. I actually carry this one with me all the time, right in the pocket of my pants, but, good to have. you never know when you’re gonna need that. Wire-strippers, and cutters. Again, if we have an electrical problem … A lot of times, we can talk you through it, or you can find it very easily yourself, but having a good pair of strippers on board, it makes that job a lot easier for us stripping that wire back.
I like to bring a couple pair of channel locks if I’ve got a plumbing issue, and usually I can get by with a bind if I got to tighten something up with a channel locks. And again, this can be purchased at your local box store. Christmas is a great time to pick this stuff up because they’ve usually got kits on sale, relatively low price. And you don’t need the best ones. A lot of these tools are very expensive tools. This is how I make my living. You don’t need the best tools for your basic kit that you keep in your camper.
I usually will carry a Phillips and a regular screwdriver. These are like mid-size so they’re pretty much good for almost every application, unless it’s something specific. we’ve already talked about the crimpers. I do carry a pair of side cutters with me. Sometimes these are just a little easier to make a cut close to something or pull a staple out that may be in our carpet or what have you. But, again, pair of side cutters.
Needle nose. You can always get yourself out of a bind with a pair of needle nose. Especially, when you drop something in that spot that my little fat fingers can’t get into. Needle nose, it makes it very easy for that. there is some neat, small kits out there. Again, the big box store, Sears, all of them have kits that have couple different size open end box wrenches. This is one of the ones I carry in the small kit that I have that’s all over my toolbox cause I left it open. i also bring a couple of adjustable wrenches with me as well. Reason for the adjustable wrenches is, they’re adjustable. We can use them for almost any size, anything to get you out of a bind.
Again, these aren’t tools to, you know, fix the problem per se, but enough to get us by for the weekend before you can get it in for service and get it ap- repaired appropriately. an electrical tested. This particular one right here is for 120 volt power. Pretty much, I’m just going to plug it into the outlet and it’ll tell me if my power is good, tell me if it’s wired properly, and tell me if power is present. So that’s a good one. I take phone calls a lot where, “My TV’s not working.” “Well, do you have power at the outlet?” “I don’t know, Randy.” (laughs) well, I’m gonna- Having you plug something else in, but if you’ve got a quick electrical tester to plug it in, then you can tell me.
This guy right here is for checking 12 volt power. It’s called a stab tester, 12 volt tester. We’d hook this into ground or anything pretty much metal on the camper and then we can test our fuses with this guy here. I’m gonna have Josh pan in on one of these fuses here. This is a great way to test our fuses so if you can pan right in on that and see the two metal tabs on either side of the 40 there, Josh. Each one of those is a test point so I can test if I’ve got power coming in in the fuse and I can test if I’ve got power going out of the fuse.
So when you’re looking at a whole fuse panel and you’re trying to determine which one is the one for your furnace or your LP detector, something like that, which is labeled incorrectly, by testing both sides, as well as the fuses, we can quickly determine whether one is blown or not. And again, we would do that in conjunction with this tester here. This will also test if we’ve got power at breakers and things like that on the 12 volt side of things so when you call me up and tell me that your slide outs not going out, I’m going to ask you if you’ve got 12 volt power to the breaker going through the breaker to the slide out. This is a great way to test that.
This is another tester that I carry with me. Kind of [00:06:00] on the same lines of this one here, but I can actually put this next to any wire and it’ll tell if it’s 120 volt wire and it’ll tell me if I have voltage present rather than putting it into an outlet. It’s called a [wiggie 00:06:09] tester.
Multimeter. This is what I love for customers to have cause we can do all sorts of testing with this guy here. Not everyone’s gonna put this, in their tool box that they keep in their camper because these can be a little bit more pricey, but if you’ve got like an inexpensive version of this and one of these, which aren’t too bad, we can usually get by anything.
So anyway, there’s just some of the tools that I bring with [00:06:30] me camping and, again, enough to get you out of trouble in a pinch. maybe not make the final repair, but definitely continue on with your camping weekend if you are having a small problem. So, just wanted to share that with you guys and if you’re looking for presents for Father’s day, birthdays, or even Christmas, great time to put this little tool kit together and can be done for relatively, inexpensive on the Father Day, on the Christmas side of things, cause that’s when we see a lot of tools on sale at our local box store. So, thanks for watching Quick Tips with Randy today. look forward to seeing you on the road and happy camping.
Pete’s RV Center is an exceptional dealership group serving the United States and Canada since 1952. With multiple locations, Pete’s RV provides sales, service, parts, accessories, and education to our community of RVers all across North America.
How to Clean Your RVs Holding Tanks Sensors
Wednesday, November, 26th 2014 15:26:23
Resident RV Expert Randy Murray discusses a multitude of ways to clean your gray/black water holding tank sensors, clearing all inaccurate monitor panel readings from your camper on the†Pete’s RV YouTube Channel.
Sometimes you may get a full tank reading on the monitor panel inside your camper even after youve dumped your gray and black tanks. Randy notes that this is generally caused by a buildup of waste materials or anything that might have made its way down the toilet. These items can block the sensors preventing the correct readout.
Randy provides a few preemptive approaches to make sure you won’t have to deal with that faulty reading. The first is making sure before you flush that you add extra water so the toilet paper (making sure you use RV toilet paper) won’t clump up or dry out to the inside of the tank walls, the next is making sure the tanks are as full as possible (making sure not to overfill) before they are dumped. Randy suggests the use of a tank flush chock to assist in filling your holding tank before it’s dumped.
The good news is that there are other tools for when all else fails. The first one Randy recommends is what’s called an RV swivel stick, which he explains attaches to a hose and sprays around water at a high velocity to break down any tank buildup. †Depending on whether you own a travel trailer or fifth wheel, a longer flexible version is available for the harder to reach holding tanks. Lastly, filling up a 5-gallon bucket with hot water and pouring it down the toilet should help alleviate the issue by steaming away the blockage from the sensors.
Pete’s RV Center is an extraordinary recreational vehicle dealer with locations in South Burlington, VT, Schererville, IN and South Windsor, CT. An RV sales and service provider since 1952, Pete’s RV Center carries an extensive inventory of Keystone, Crossroads, Coachman, Heartland, Evergreen and Forest River RV-branded campers.
To learn more from Randy as well as stay up to date on all things Pete’s RV be sure to visit and subscribe to our YouTube Channel.
How to Properly Use The Air Conditioner in Your Camper
Wednesday, July 3oth 2014 20:03:48
Learn All About Using Your Campers Air Conditioning on the Pete’s RV YouTube channel.
Randy gives a quick important lesson teaching us that air conditioners work by removing warm air and moisture from around the room, which then gets sucked outside leaving the room cooler.
In order to make sure your AC is running properly, Randy shows us how to remove and check the air filter to make sure there isn’t a buildup of dirt and dust hindering performance. Making sure the fan is on will increase efficiently with the AC system, as well as making sure that all doors, windows, and shades are closed to prevent heat from working its way back inside the camper.
Randy advises turning on the AC when temperatures are cooler (typically early morning) for optimal air flow and a cooler camper throughout the day. By using the quick cool option to restrict airflow from the ducts, the AC can effectively cool the room faster and when it reaches a temperature to your liking, airflow can be redirected back through the vents for everyone to enjoy.
To learn more from Randy and stay up to date on all things Pete’s RV be sure to visit and subscribe to our YouTube channel.
Video Transcript | How to Properly Use The Air Conditioner in Your Camper
Randy: Hey guys, Randy with Pete’s RV TV today, another quick-tip segment for you. Today I’m going to talk about air conditioners and the proper way to use them. I’ve been taking a lot of calls around the country and we’re in the middle of our warm season in Vermont, the little warm season that we get up here in the northeast. But people are having trouble with their air conditioners freezing up. People are saying they’re not cooling properly for them. And sometimes that’s the case, but usually it’s operator error about 99 percent of the time.
When I went to RVIA school back a million years ago when I first started in the industry and got certified to do this kind of stuff, one of the first things they taught me about air conditioners is they don’t make cool. They remove heat and they remove moisture, as well. cool just happens to be a byproduct.
So, when we allow our coach to heat up inside, we go to the pool all day, we’re out shopping or doing, visiting the sights around the area and we’ve got the air conditioner off, we go back to our camper at 5 o’clock at night. It’s 100 degrees inside the camper. We turn that air conditioner on. That air conditioner actually has to pull the heat out of the carpet, out of the bedding, out of the couches, out of everything inside before we start to feel cool.
So what I want you to do is I want you to do is turn that air conditioner on in the morning. it’s a little bit cooler at night, so when it’s a little bit cooler at night, of course, the coach stays a little bit cooler. So when you get up in the morning set that thermostat at about 65 degrees, 67 degrees. Let’s maintain that cool from the night before. Now, if we never let our coach heat up, the air conditioner is going to have to work a lot less hard to maintain that cool and we’re actually saving energy.
The other thing that we want to do with our air conditioner, too, is while we maintain it while we’re using it is we want to make sure that the filters are clean. So we can remove that very easily on this guy here and we just want to take this guy out and make sure it’s vacuumed. If it starts to turn brown that usually means there’s a lot of dust.
Another thing that makes an air conditioner work very effectively for us, or makes them work better, is more air flow. So with a clean filter we can get more air through this air conditioner, especially on those [00:02:00] hot, humid days.
the other thing we’ll, we’ll want to do is we want to set our fan on high. I usually use the auto setting on mine, if you let the air conditioner run all day. Again, the more air that we’re moving, the more heat we can take out of the coach and expend outside and put the cold air back inside the coach. So fan definitely on high.
We also want to make sure our doors and windows and vents are closed. I went to a camper on a campground the other day. A lady says, “My air conditioner is not cooling very well. Can you take a look at it?” I went inside. I put my hand up to the air conditioner, it was cooling just fine. What she had was both of her doors were open. She had some vents open, a couple windows open. So what that air conditioner was doing was pulling the heat from the outside and just getting rid of that and returning it so it could never bring the temperature of the coach down because it was just kind of maintaining.
What these guys will do is they’ll actually do about a 20-degree air differential, air temperature differential. So, it sucks in here, blows out here or out through our vents, and it’s going to be about a 20-degree differential. Now, if it’s just pulling air from a door, it’s never going to really bring the temperature of the coach down, so make sure all windows and doors and vents are closed. and again, that high air flow moving through the air conditioner is going to get that heat escape faster and help us with freeze up a little bit, too. The moisture will actually pass over the evaporator coil a lot quicker and not have a tendency to grab on there.
Another thing, we just got to our campgrounds, its 5 o’clock at night, we’ve been traveling all day, inside the camper it’s very hot because it’s a hot day out, so you got to turn your air conditioner on to cool this guy down. Instead of forcing it through the vents, if you’ve got a ducted air conditioner, open up the quick-cool option. This way we’re going to get a lot of airflow and we’re going to cool the coach down a little bit quicker.
Once we bring the temperature down, we can go ahead and close this and we can go through the ducts. The ducts are going to restrict the airflow a little bit, but once we bring the coach down the air conditioner is running efficiently, then we can go ahead and put it through the vents in the ceiling.
So if you try out my quick tips here, run it on high, set it in the morning, let it run all day to keep that cool inside so we don’t have to remove all that heat from building up in the sun all day. Also, if you can close your shades and things [00:04:00] like that, keep the UVs down, that’s going to help out a lot as well.
But all these should help you make your air conditioner work a lot more effectively for you. Save a phone call to me and just have a better camping experience, keep you guys cool. Now, out there having fun, you get hot, you want to come into a cool area, at least I do, and it makes it a lot more fun when you’re drinking a soda or whatever while you’re watching TV, as well.
So thanks again for watching Pete’s RV with Randy today. keep an eye out for our quick tips. Join us on our Facebook page. Sign up [ 00:04:26] on Youtube and happy camping (laughs). Have a great one.
How to Prevent Damage to Your Camper’s Water Heater
Tuesday, June 3rd, 2014 18:00:03
PetesRV.com Resident RV Expert Randy Murray brings attention to a common mistake made by turning on the hot water heater and how to prevent any damage from occurring.
When it comes to using the hot water heater in your camper, it’s crucial to make sure that there is actually water in the tank. Randy stresses that no water in the tank results in a burned out electric element–rendering the hot water heater useless.
Randy demonstrates an insanely simple way to prevent the element from getting damaged. Every hot water heater is equipped with a pressure relief valve. It functions to protect the water heater from building up to much pressure. If it does, water is released from the valve. A quick press on the spring-loaded valve handle will tell you immediately whether or not there is water in the tank. If there is, you are good to fire up the water heater. If not, check hookups and bypass valves to ensure water flowing to the tank.
Learn more tips and service advice from Randy as well as much more on the Pete’s RV YouTube Channel.
Resident RV Expert Randy Murray delivers on a crucial RV question via the Pete’s RV YouTube Channel, “What is the importance of slide toppers (aka slideout awnings)?”
When it comes to protecting the vitality and value of your RV, slideout seals found around the slide are the lifeline to the health and well-being of your camper. As Randy explains, if you compromise or damage those seals then you risk water potentially penetrating into the camper provoking damage over time.
Randy presents a prime example of just how well slide toppers can defend your camper after a weekend at the campground. Sprinkling a box full of debris on the slides to simulate a weekend of buildup, you can clearly see that everything rolls off as the slides are brought in.
A highly-affordable investment, slide toppers can save RV owners thousands of dollars in repairs! For just a few extra dollars a month, their installation can be built right into your new RV payment plan.
Determining a Camper’s Insulation R-Value
Tuesday, December 3rd 2013 21:10:37
RV Lifestyle Consultant Randy Murray unfolds the mystery of the R-Value in relation to how well a camper is insulated on the Pete’s RV YouTube Channel.
When shopping for a new camper, the salesperson will usually sling around R-Values like they’re the next best thing since the black tank flush. The only problem is that these values hold little meaning to you other than the bigger the number the better the insulation.
R-Value is a measurement of thermal resistance. There is a scale and calculations surrounding R-Value, but as Randy points out, you can take a much less technical approach to determine how well an RV is insulated:
1. Look for visible proof of sound insulation construction practices such as a sealed underbelly, finished storage compartments, and the use thermal foil beneath the carpet in slideouts.
2. Request a breakaway view of the RV you are shopping. This allows you to see where and what type of insulating materials are used throughout the coach. Quite a few manufacturers provide breakaway views in their brochures and promotional materials. A salesperson that is on the ball can get you this information plus be at your service to point out all of the insulation features found in any camper that is on your buying radar.
3. Hints of a good R-Value is a camper with a published temperature rating. Nowadays, most campers come with a thermal package (i.e. “Arctic Package”). Manufacturers relate these packages with a degree rating (some are even third-party certified). Note here that while manufacturers push how well these coaches perform in cold weather, it is also a good indicator that they are equally effective keeping interiors cool in hot weather.
Video Transcript | How Do I Determine a Camper’s Insulation R-Value?
Randy: Hey guys Randy with Petes RV TV here today, another quick tip segment for you. Today Im going to talk about R-values and what they do for your camper and pretty much what they are. So an R-value is a way we measure our insulation value in the unit. You know R-value is a measurement of thermal resistance so how quickly heat passes through whatever we are trying to block it with pretty much. So in the RV world our values are often exploded, so they, they say that they are a lot better than they actually are.
So a really great thing to do if you want to educate yourself best on the product that you are purchasing is ask to see a breakdown of the unit. See where the insulation is in the unit. Some of our manufactures will supply us with things like this. This is actually a floor for a big horn this is a laminated floor, and this is a very well insulated floor. This is the roof of the same big horn unit; its a laminated roof.
Its going to take a while for heat to pass through that so this has got a pretty good R-value in it. Also in the RV world we are passing were adding things like this here foil wrap here to a floor, under a floor, which also creates some thermal protection for us as well. And that will add and stack a little bit of an R-value.
When we get in to our less expensive units our aluminum sided campers and things like that, they are going to have a little less R-value in it than we are going to see on say like a fiberglass sided camper just because of the insulation they are using, the thickness of the walls. A little bit less expensive unit were apt to see a little less insulation. Insulation is a little bit expensive. So another great way that you can find out how well a unit is insulated is some manufactures will put a degree rating on the unit.
You know, everybody will say oh my walls are a R11 and my floors are R27, what have you. What is that camper good down to? What has it been tested at? Not everybody does this but some of the big manufactures will do this when you look at like some of the Cougars. Theyre tested down to 20 degrees and some of these guys are even going a little bit further than [02:00] that when we get up into the Montanas and the big horns.
Were seeing a zero degree rated unit with the furnace on, so grab a brochure or go to a website or go to our website, petesrv.com. Weve got all our product on there with brochures and pdfs so you can see the breakdowns. On this Cougar here, if Josh will pan in on it, we can see that they have showed us how they have put the insulation in the roof and into the floor systems and things like that.
That way we can see what kind of insulation we are getting in the rig, if its going to work in our particular application. People are using these a lot further in the fall now, A lot earlier in the spring. Camp grounds are opening up a little bit more so here is another great example. Bullet from Keystones has actually done a great breakdown and shows us how they insulate their walls and their floors systems. So educate yourself on what you are getting and if its an important thing for you make sure that you know what you are talking about and your sales guy knows what you are talking about.
If you have any questions you can always give us a call. Wed be happy to educate you on it and talk about those degree ratings and how you are going to be using the unit, and if its not the perfect insulated unit for you, how you can achieve to use it in the circumstance that you want to use it and if youre going to be trying to use it in a little colder weather as well.
Another thing that people dont think about with R-values too is warm weather. When we have an air conditioner on inside and its really hot outside the R-values are going to help keep us cool as well. So if youre in a climate that has a little bit warmer and your down in the southwest or something like that, where we see lot longer heat days for more portion of the summer the R-values are going to be very important for you as well, too.
So make sure you know about R-values, make sure you know what you are getting, if you have any questions at all feel free to contact us. Check out the information. We try to provide as much as we can for you on our web site, also on our Facebook page as well.
So there it is in a nut shell, R-values. Thanks for watching Petes RV with Randy today.