Considering purchasing a new or used RV? Do you want a motorhome, travel trailer, fifth wheel, or toy hauler? There’s a lot to consider when choosing the right RV for you. Here’s a quick guide to RV floor plans, and how to choose between them.
Motorized or towable?
The very first choice you will need to make, do you want to drive your RV or tow it? There are advantages and disadvantages to both. If you’re leaning toward towing, check out our towing capacity guide to make sure your vehicle can tow your next RV.
What kind of motorhome?
Just like with towables, size matters in motorhomes. There are three main types of driveable RVs: Class A, Class B, and Class C, motorhomes, all of which differ in size and shape.
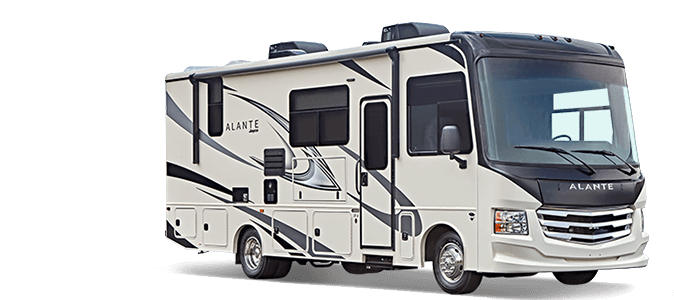
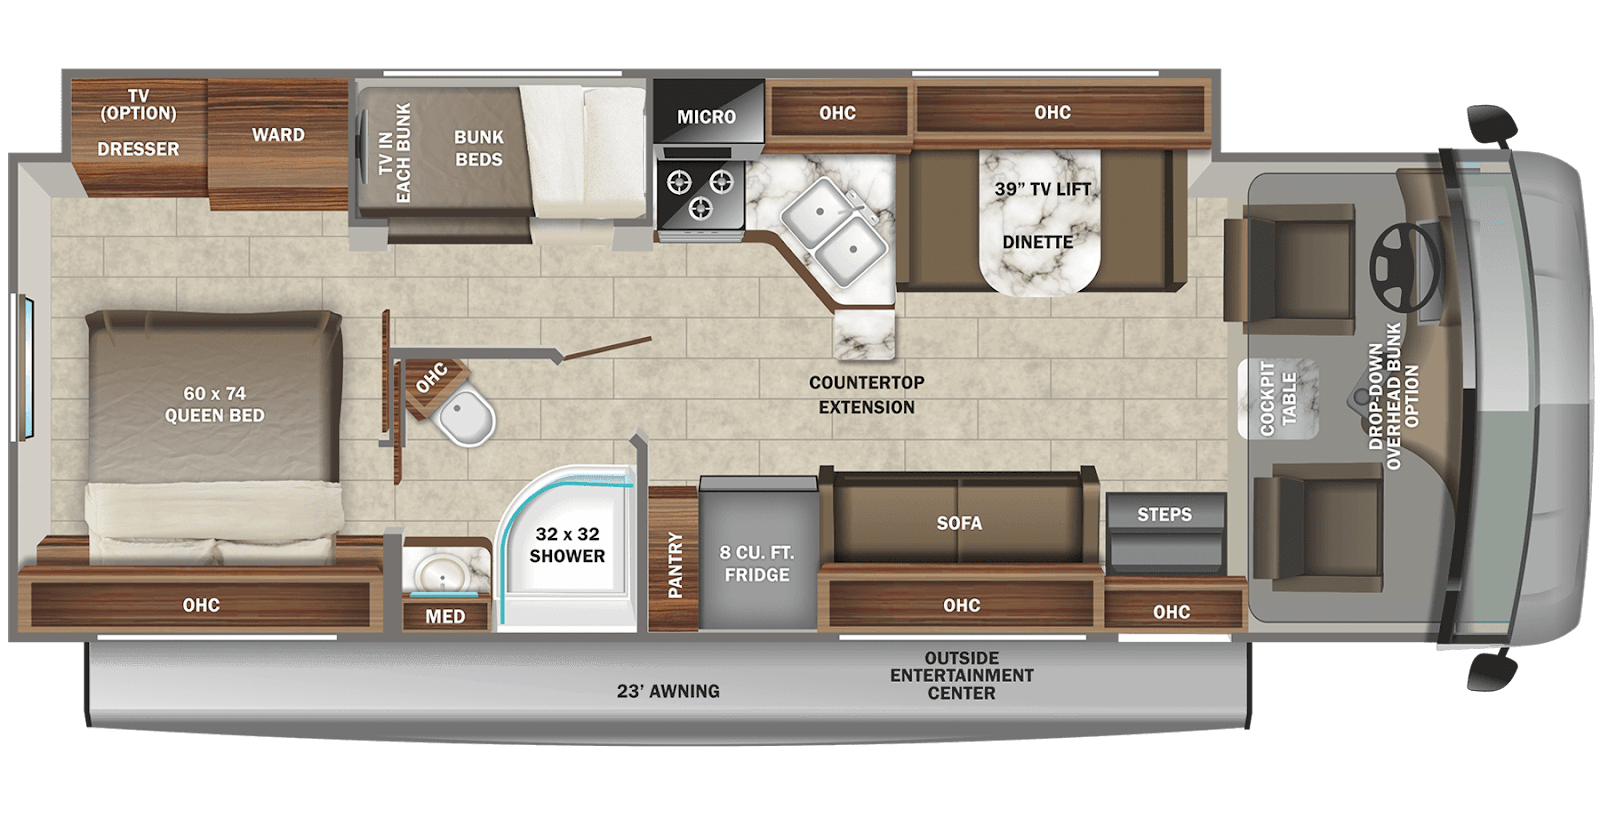
The Jayco Alante 29F is one of our most popular Class A motorhomes, and as you can see, it resembles a bus that comfortably fits a family inside. Many Class A RVs use diesel instead of standard gasoline, and come with many luxurious features that make them a higher priced option than most Class C’s.
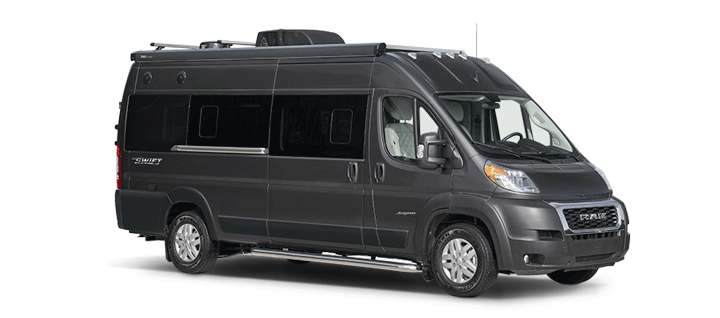
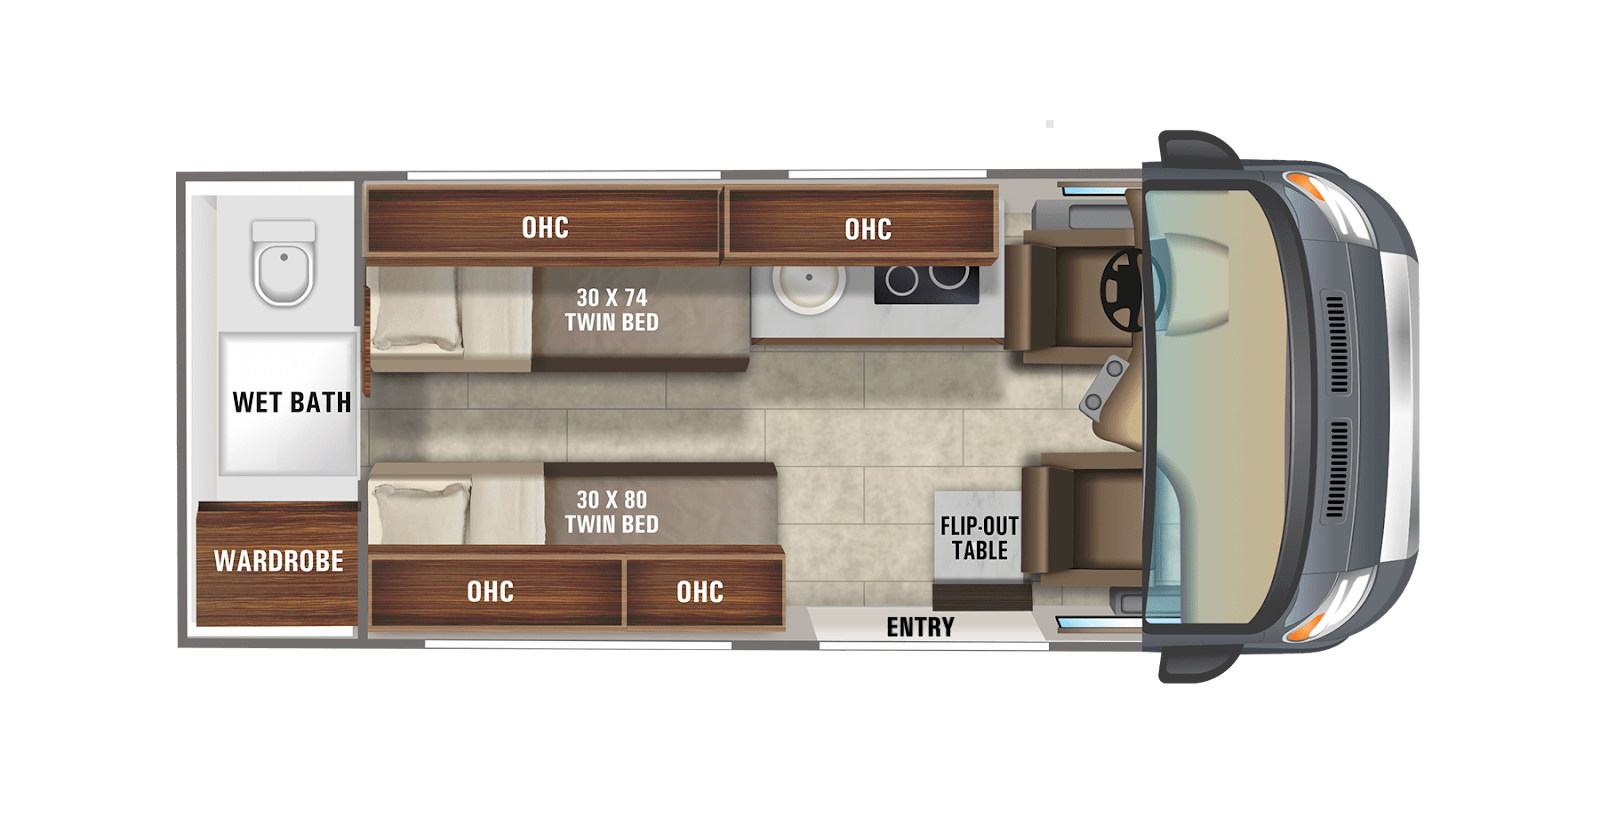
The Jayco Swift 20T is an example of a Class B RV, which runs significantly smaller than Class A or Class C motorhomes, and resembles a typical passenger van on the outside. On the inside, there’s enough room for a couple to vacation out of, while keeping the vehicle small for driveability. Many campers even boondock in more rugged editions of Class B’s, such as the Jayco Terrain, an adventure Class B.
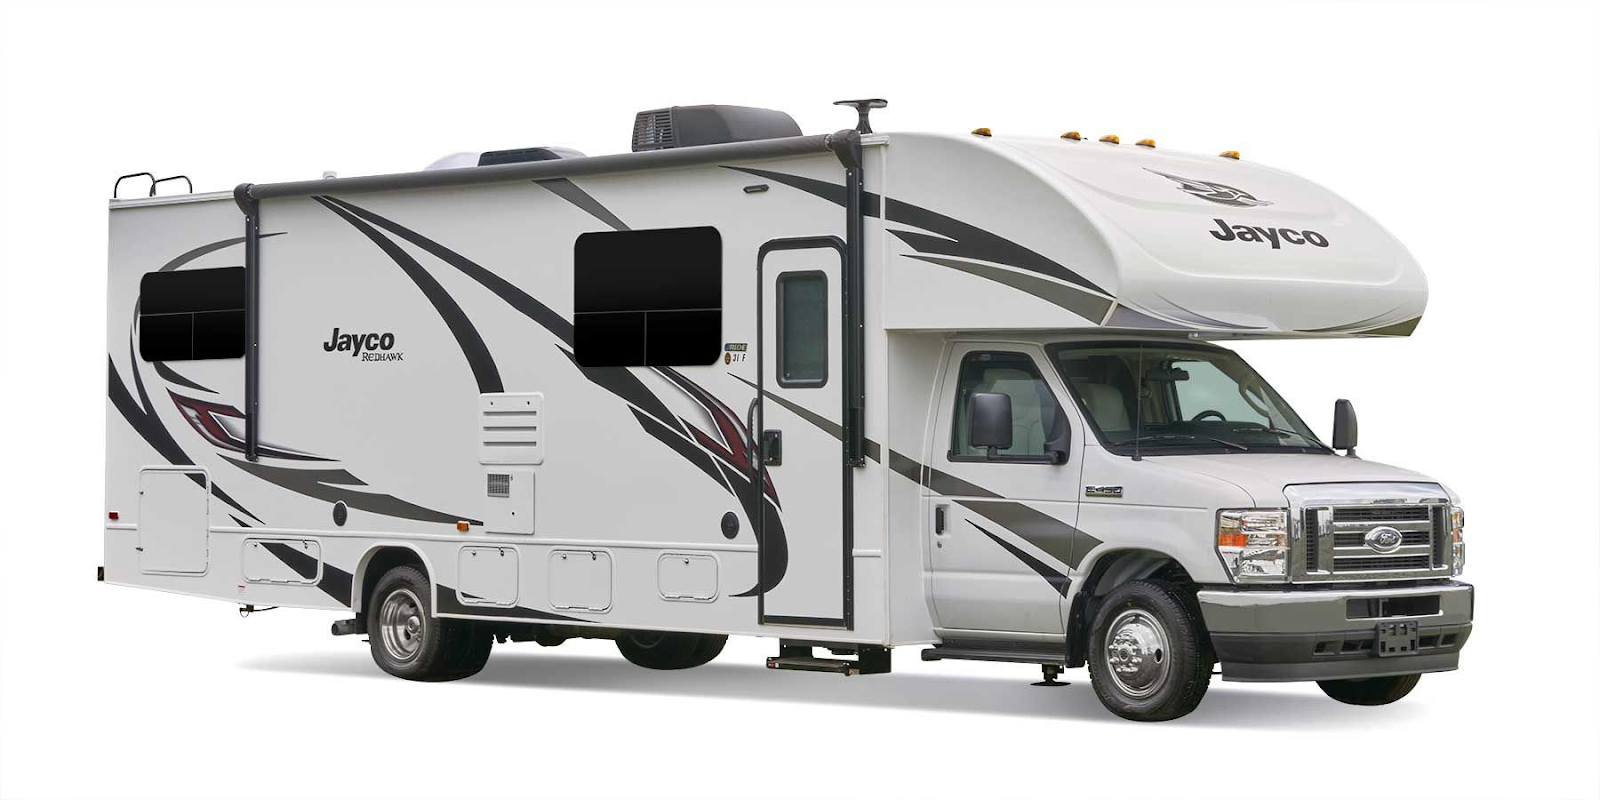
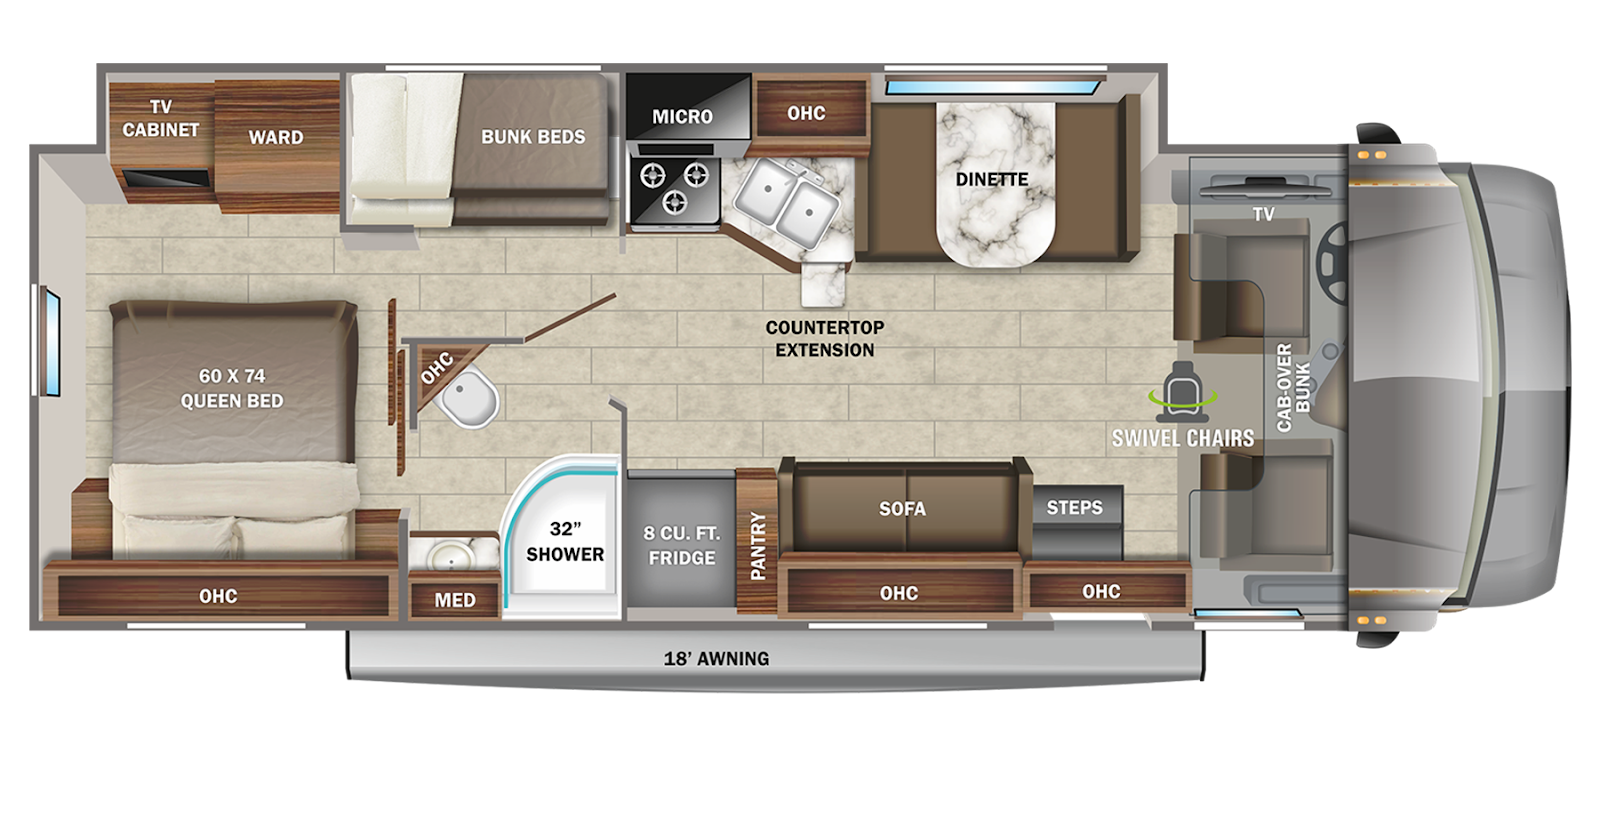
The popular Jayco Redhawk 31F is a well known example of a Class C RV. Known for their cab over bunks hanging over the driver’s seat area, Class C’s are the original motorhome, and their high quality for families or couples has stood the test of time. They come in gasoline or diesel, depending on the model, and drive more like a large truck than the more bus shaped Class A’s.
What kind of travel trailer?
There are even more options for travel trailers than motorhomes, not including fifth wheels, which are towed differently than travel trailers and run considerably larger.
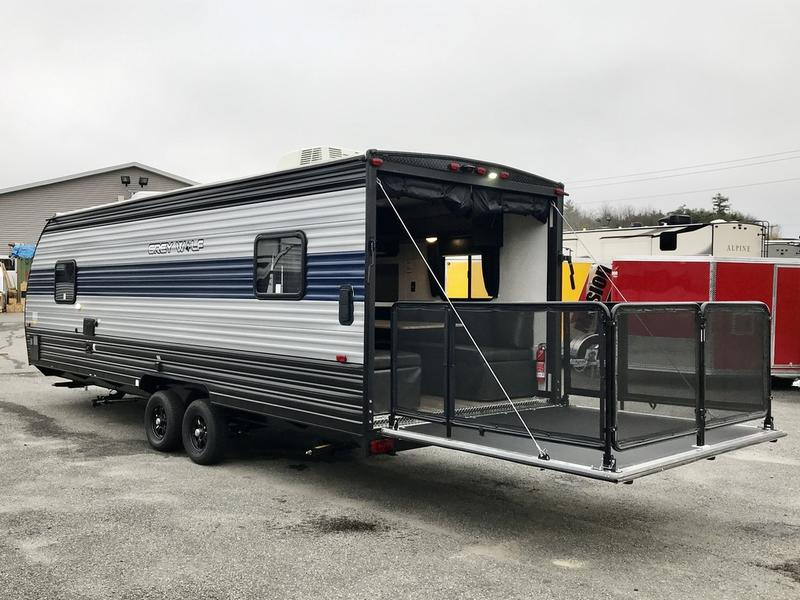
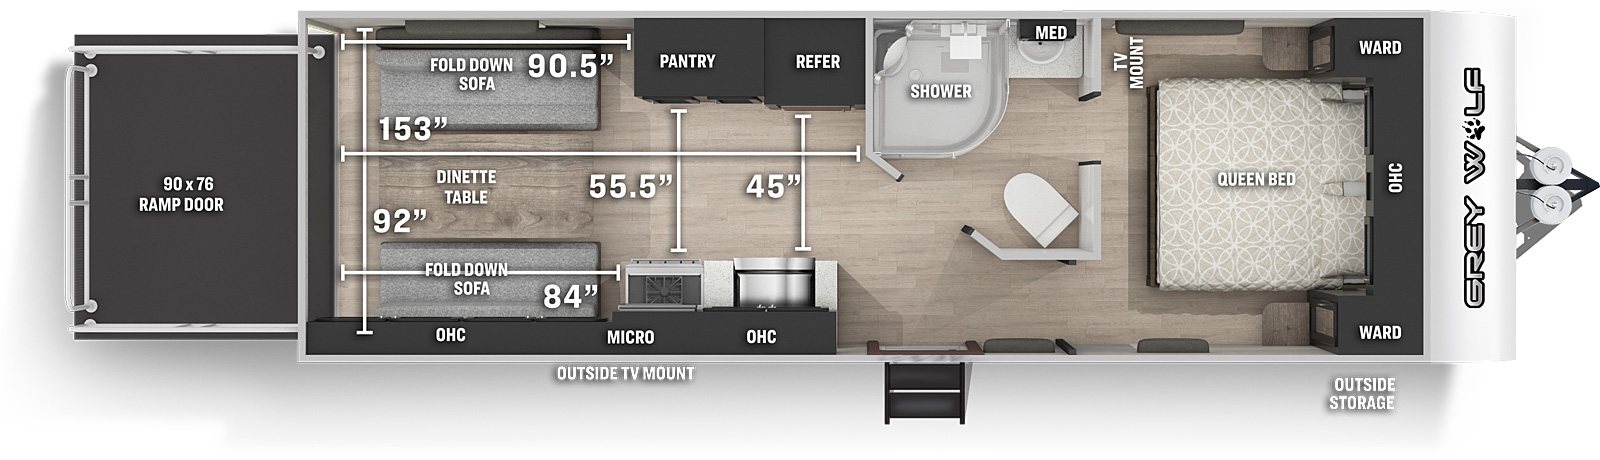
The Forest River Grey Wolf 22RR is considered a toy hauler, which is a travel trailer designed to fit other vehicles inside, such as motorcycles or four wheelers. The ramp door for vehicle entrance is on the rear of all Forest River toy haulers, so that ramp door also doubles as a party deck! Many toy haulers come with no slides, to keep the weight of the RV down to account for the heavy vehicles inside. These are great for couples or a small family who values outdoor adventures.
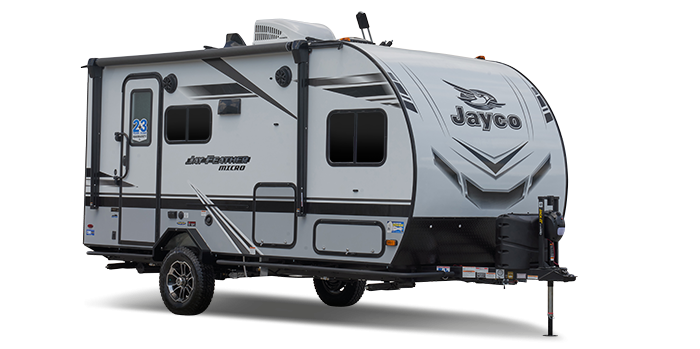
Single axle trailers have just one pair of wheels holding them up, such as this on Jayco Jay Feather Micro 199MBS. Only very lightweight travel trailers are constructed this way, and most single axles are for couples. They’re the easiest trailers to tow and park, as well as the lightest.
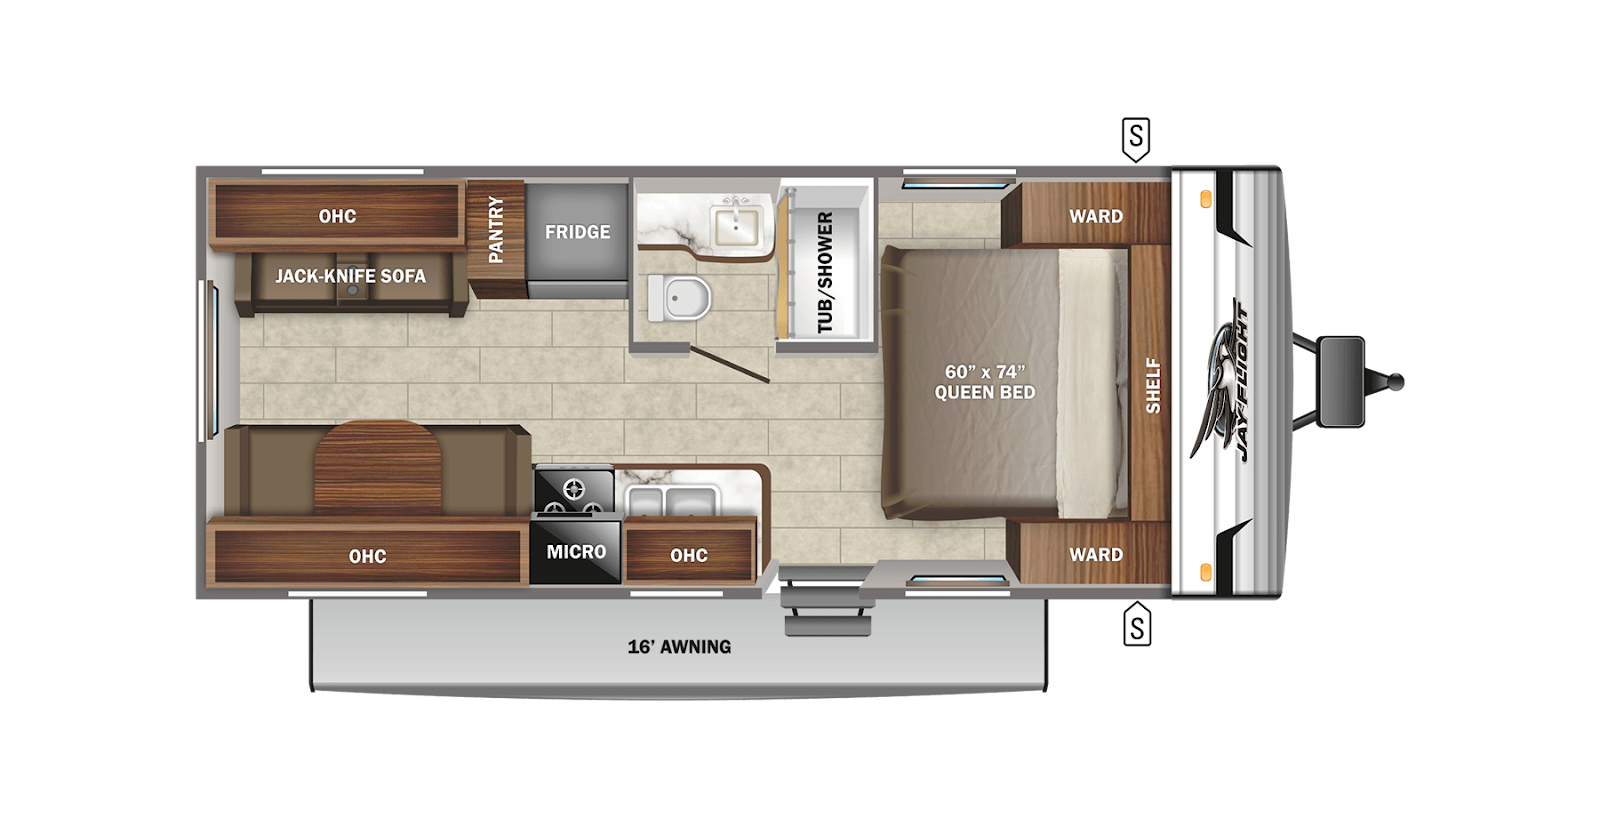
The 2022 Jayco Jay Flight SLX 8 267BHS is a double axle travel trailer due to its four wheels. It’s also an example of a bunkhouse floor plan, due to the bunk beds in the rear that serve as an additional sleeping area to the queen bed up front. Bunkhouses are great for families, particularly Jayco’s double bunk bed setup which creates spacious sleeping areas for all family members. However, RVers who travel solo or as a couple tend to prefer floor plans without bunkhouses, to have more room in their kitchen or living areas.
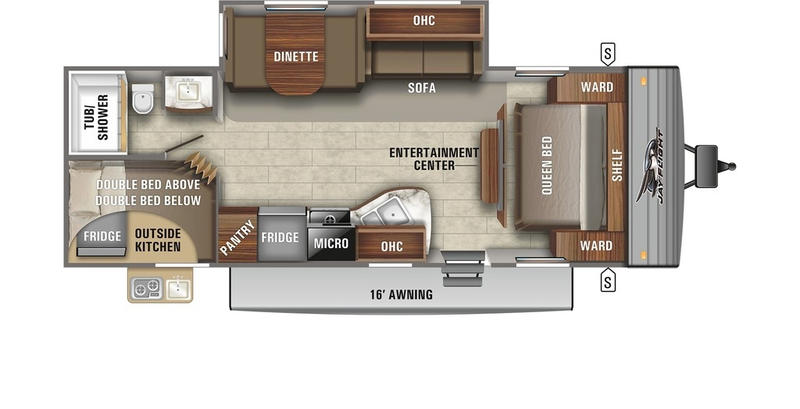
The Jayco Eagle 332CBOK is a large couple’s travel trailer, which lacks bunks and has space for a larger living area.
Now that you know the basic floor plan styles of motorhomes and travel trailers, you are ready to browse more detailed varieties of RV floor plans. For more RV tips, tricks, and news, follow our Pete’s RV Info Blog today!
Cooling down your food and drinks in the summer is no joke, be informed about RV refrigeration!
The three most common types of refrigerators you will see in a RV are 12 volt, gas electric style, and residential. Here’s a quick guide on each:
Gas Electric Fridge
The popular gas electric style of refrigerators are the best kind to use for boondocking. They can cool and freeze food running off of just propane or electricity, without any enhancers necessary. They do take 3 – 6 hours to efficiently cool down, and your RV must be perfectly level in order to ensure that the refrigerator technology can cool at the campsite.
12 Volt Fridge
12 volt refrigerators operate from the 12 volt battery on your RV. They are efficient with power usage, but they are smaller in size in order to keep up this efficiency. If you don’t have an enhanced battery system or solar setup on your RV, you may want to avoid using a 12 volt fridge on a boondocking trip, since this fridge pulls right from your RV battery.
Residential Fridge
Full residential refrigerators are increasing in popularity in many fifth wheels and large travel trailers. They’re often as large as refrigerators in a standard home, they cool reliably, they don’t use a lot of power, and are far less expensive than gas electric refrigerators. Being a larger refrigerator, it is more difficult to remove them from RVs, and a converter is required to power them.
Each type of refrigerator is very reliable, many RV fridges last for decades at the same quality as the day of purchase. The refrigerator you choose is based on your own boondocking habits and power needs of your RV.
For more RV tips, tricks, news and info, follow our Pete’s RV Info Blog today!
You know you love road trips, but how do you choose which RV is right for your family when so much goes into it on and off the road? Here are a few things to think about before diving into this purchase.
Driveable or towable?
Maybe your fancy new pickup truck is ready to tow a few thousand pounds across the country, or maybe you don’t own a vehicle with any towing capacity at all. Either way, you’ll need to seriously consider whether you prefer a towable or driveable RV.
RVers for decades have debated whether motorhomes or towable RVs are easier to drive. Motorhomes provide the convenience of having just one vehicle to worry about, giving them the loving nickname of a “house on wheels”. But despite being one compact unit, many motorhomes end up being larger than many towable travel trailer setups.
Despite the frequently tiny size of travel trailers, many people just don’t like towing something. You’ll have to give a motorhome a test drive, and then tow a travel trailer, to see where you land on this debate.
What are you towing with?
If you do end up choosing a towable RV, that’s great! What are you going to tow it with? The answer to that question will determine how big or small your travel trailer, or even fifth wheel, can be. Some travel trailers, like this Little Guy, can be towed by a vehicle as small as a Toyota RAV4, a small SUV. But Fifth Wheels, typically the largest towable RVs, can sometimes top 15,000 pounds.
The most important part of owning a towable vehicle is towing safely, so be sure to do your own research about what your vehicle can and cannot tow before proceeding.
Cargo Capacity
Keeping size in mind, your RV’s cargo capacity will tell you how much weight you can put in it. This includes everything you’re bringing along, so while your campground bathing suits are lightweight, the full 60 gallon freshwater tank is definitely not.
Cargo capacity isn’t as big of a deal if you’re camping in one place all summer, where water refills and waste dumping is easier, but it’s important to keep in mind on more road heavy trips. Extra storage in and around the RV is also essential for those bringing a significant amount of luggage.
What is your RV for?
Are you permanently retiring in your RV, which you plan on parking in Florida forever? Are you working remotely and driving to a different National Park each night? Are you camping at one campground for two weeks each summer?
It’s good to have at least a rough idea of how you’ll be using your RV before you buy it. If you’re on the road daily, you’ll want to seriously consider purchasing as small an RV as you can, to save more gas and generally make driving easier.
Many state and national parks do not have campground spots for RVs longer than 35, or sometimes even 30 feet. Even if you plan on parking in one private campground, check if they have any size restrictions.
Buying a RV is the highlight of a lifetime for many campers, and your big purchase deserves the same enthusiasm! Check out our RV Education section at petesrv.com for more information about RVing, and the best RV selection around in our inventory!
Pete’s RV TV is the official YouTube channel of our five Pete’s RV Center dealerships, and is a great source for news, information, and walkthroughs of our RVs. Recently hitting 20,000 subscribers, we are grateful for each one, and strive to provide useful RV information.
Frequently our most popular YouTube offerings, our Walkthrough videos have amassed quite a following. They are a great way to tour the newest and most exciting RVs on the market without having to be at the dealership. The following is a list of our most popular Walkthrough videos of the 2021 RV production season, so that you can sit back and debate which of our offerings is your favorite.
First and foremost, one of our most famous travel trailers: the Airstream 33FB Twin.
The 2021 Jayco Swift 20T is one of our most watched videos, and most interesting motorhomes! The size of a standard van, its interior is dazzling!
We love Jayco Eagles at Pete’s RV Center, and this is one of the best!
This Eagle Half Ton has collected the third most views of any video on our channel this year, and we can see why!
With the most views on our channel ever, Jayco Rep Cody Weatherton guest stars to show us one of our most popular motorhomes.
Last but not least, our Nucamp RVs are always a hit with the boondocking crowd, and we can certainly see why!
For more of our walkthrough videos, announcements, and sales, check out our YouTube channel today and be sure to subscribe and be notified about our newest and most exciting floor plans.
Hey guys. Welcome to Pete’s RV Center. My name is Christine. I work in the Vermont location. I’m going to talk to you a little bit about what is included in our Full Protection Platinum Package. Um, so then that way you guys have an understanding and know what is covered in your camper. Um, so first off, you are going to have in your Protection package, is a service coverage. Everything covers you for five years. You’re going to have all of the major appliance covered. You’re going to have your microwave, your stove, your refrigerator, your AC system, all of your holding tanks. Anything electrical and mechanical will be covered in this camper.
Uh, you also have a 100% parts and labor, that’s going to be covered so you don’t have to worry about paying those additional costs. You will also have, um, a mobile technician straight for you to use, that will come to wherever you are, so then you don’t have to worry about pulling your camper if you are a seasonal camper, or you’re just gotten to your camping location. Within this Protection, you also are going to have an eco-protection, a tire protection, and roadside assistance.
Going to go a little bit more to explain to you what the eco-protection is, which is an interior/exterior protection. Included in that, you will see that I’m dropping some oil onto a little platform. I’m going to explain how that’s going to protect you, and then I will show you how that works. Uh, the interior/exterior protection will protect all of your upholstery from stains and odors, mildew, bacteria, viruses, and it’ll protect the outside of the camper from any harsh elements such as sun fading, acid rain, and bird droppings.
As you can see, with that little bit of talking, with the upholstery that you have here, you have one side that is not protected, and one side that is protected. The unprotected side, the oil has seeped in. If you can see, the oil has not seeped in on the other side. That is going to put a barrier, which protects all of that upholstery, even leather, if you have jeans that might [transpire 00:02:17] to that leather, it will protect that as well.
If you guys want to come onto the outside, I’ll go ahead and explain the tire portion. Now that we’re on the outside of the camper, I’m going to just point a few more features on the outside that are also covered on under the service coverage. Uh, you will have any of the kitchenettes, refrigerator, stoves, um, are also all covered, along with the propane connection and electrical connection. Your awnings and any slide outs your camper might have, as well.
On to the tire portion, your tires are covered, um, with a multi seal and a road hazard. So how that’s going to protect you is it gives you a longer life in the tire, so if you roll over any form of debris, it automatically fills that hole, and it helps breakdown, helps protect the breakdown of that rubber as well. Um, if you damage any of the wheel as far as hitting a pothole, you will also have that covered on both your camper, and your towing unit.
One of my personal favorites is also the roadside assistance. With the roadside assistance, you have a 24 hour help hotline and an emergency line. So if you run into any situation along your camping adventures, you can call them. They will walk you through it. They will help you. Um, and they also have a lockout service, as well, so if you ever lock yourself out, they can come and unlock the camper for you. If you have any other questions, or if you want some more details, please feel free to call any of our locations. Ask for the de- business department, and we would be happy to answer any of your questions. I hope you’ve enjoyed this video, and happy camping!
The transcript of this presentation is available here.
Pete’s RV Center is prepared for all of your RV care needs. With locations in Vermont, Massachusetts, Connecticut, Pennsylvania, and Indiana, come check out petesrv.com today to make all your camping dreams come true.
Pete’s RV-TV YouTube Channel Resident RV Expert Randy Murray discusses a multitude of ways to clean your gray/black water holding tank sensors, clearing all inaccurate monitor panel readings from your camper. Sometimes you may get a full tank reading on the monitor panel inside your camper even after you’ve dumped your gray and black tanks.
Randy notes that this is generally caused by a build up of waste materials or anything that might have made its way down the toilet. These items can block the sensors preventing the correct read out.
Randy provides a few preemptive approaches to make sure you won’t have to deal with that faulty reading. The first is making sure before you flush that you add extra water so the toilet paper (making sure you use RV toilet paper) won’t clump up or dry out to the inside of the tank walls, the next is making sure the tanks are as full as possible (making sure not to overfill) before they are dumped.
Randy suggests the use of a tank flush chock to assist in filling your holding tank before it’s dumped. The good news is that there are other tools for when all else fails.
The first one Randy recommends is what’s called an RV swivel stick, which he explains attaches to a hose and sprays around water at a high velocity to break down any tank buildup. Depending on whether you own a travel trailer or fifth wheel, a longer flexible version is available for the harder to reach holding tanks.
Lastly, filling up a 5 gallon bucket with hot water and pouring it down the toilet should help alleviate the issue by steaming away the blockage from the sensors.
Video Transcript for “How to Clean Your RVs Holding Tank Sensors | Pete’s RV Service Tips”
Hey guys, Randy with Pete’s RV TV again with you today. Another quick tip segment for you. Have you ever gone out on a camping weekend, and you’ve dumped your tanks after the weekend, and you come back into your camper, and you get a false reading on your black or your gray tank kind of like that.
Looks full and you know it’s not. You just dumped it. Well, I’m going to take you into the bathroom here in just a few minutes, and I’m going to show you a couple of tricks to alleviate that problem for you. So let’s go take a look into a bathroom.
Alright, so here we are in a bathroom at one of the RVs we have here at the shop at Pete’s RV Center. Kind of an awkward place to have a conversation or shoot a video, but here we are anyway. Good information. So as I was mentioning earlier at the monitor panel, you know you’ve dumped the tank but it’s still reading full on you monitor panel.
How this happens is we have black ABS plastic tanks underneath our RV which are our holding tanks, our waste water holding tanks. And we actually spin weld metal sensors into the side of those tanks and hook wires to them that go back to that monitor panel. So we use continuity of what’s in the tank. We especially see this happen on the black tanks because some slime, and some sludge, and whatever else we throw down the toilet gets caught up on those sidewalls and will actually give us that false reading.
So a couple important things I want you to do while you’re camping that will help alleviate this, or make it easier for you to clean it if the problem does arise. when you have solids or paper present in the toilet bowl, I need you to fill up that toilet bowl before you dump.
Obviously if you’re dry camping, this is going to be a little harder for you to do because you want to get as much longevity out of that tank if possible. But if we’re at a campground where we can dump whenever we like, this is a great way to do it. So if there’s solids or toilet present in there, I want to see you fill that bowl up with water. I want to get as much water as I can in that bowl before I dump.
What that’s going to do, is it’s going to do things for us. It’s going to put more water into the tank, and it’s also going to help solidify anything that we put in the tank in conjunction with our toilet chemical. Make sure you’re using the appropriate RV toilet paper.
Any toilet paper that is built for a chemical toilet will work on this. It breaks down a lot quicker than some of the household toilet papers we use for septic systems, so important to do that. So we just fill that guy up and dump it, as much water as we can. Most of your today’s toilets out there will have a way where you can step on it halfway and get some water to it, and that way we’re going to get as much into that tank as possible. If you do that that will help out.
The next thing you need to do, if it does arise, especially when you’re at the campground where you can dump where you want, we’ve got these couple of little options here that work really good. And a lot of today’s new units are coming with sewer sprays on them or some kind of tank wash spray that is hooked up to the side of the unit that actually sprays inside that tank.
Here’s a couple of options that we sell in our store. We call them swizzle sticks in the shop. Heh. You hook the garden hose to this end. It’s got a little on and off valve, and it’s actually got a sprayer that spins around at a very high rate of speed down here and will actually wash the side wall of your tank.
Here’s one that’s a little bit longer. If you own a fifth wheel, this is going to be tough to do because usually the tanks are very far away from the toilet, which are not in a travel trailer situation. So fifth wheels are a little bit tougher to do. So you can use those methods.
Another method that I use when I’m at the campground is before I leave, if my tanks are getting full, I’m going to fill that tank up with water. Now, be careful when you’re doing this because you don’t want to overfill the tank and have a mess or have it come up the toilet, but I want to fill that tank up. A lot of people I see at the dump station here at the dealership, they’ll bring a garden hose in or dump it.
You can also purchase one of these guys here. This is what my prep techs use when they are prepping a camper out to make sure everything’s working properly. They’ll drop that right in and it will keep the water on while it’s filling that tank. Again, make sure you keep an eye on that tank, because if this comes up through the toilet it’s not going to be a fun thing to clean up.
Once you’ve got that tank filled, let it sit for an hour or so. Maybe do it in the morning on the last day there, while you guys are picking up. Then go ahead and pull that valve. Now that water that’s in that tank is probably going to clean those sensors off. Sometimes I’ll even put a little chemical in there. That should clean it off, get everything taken care of for you in conjunction with one of those swizzle sticks there, and the extra water we put in. That should keep those tanks reading clean.
Now, if you have one that’s not … again, typically it’s the black but sometimes I do see it on the gray. You can fill up the gray the same way. Even put a little toilet chemical down the gray and it will help out with odors. Gray odors are just as bad as black odors. I’ve had tanks apart and they really stink. So pour a little toilet chemical down in that gray water you’re using before you dump as well. It’s not going to hurt anything, plus it will keep the sensors clean.
On the really hard to clean sensors, or if you have one now that’s been dirty for a long time and are reading full for a long time and you want to get that one done, warm water. I’ll take and fill up a five gallon bucket, and I’ll dump it down the toilet of an empty tank with, of course, the valve closed on the outside. And the steam from that warm water will actually help loosen up any solids that we might have stuck to one of those sensors inside the tank. I’ve done that on numerous occasions and had very well, great, success with that as well.
There is also product that you can purchase at an RV store that you can put. It’s called a tank sensor cleaner. I put that down in there, or toilet chemical cleaner, or toilet chemical works pretty well as well. And if it, again, it’s one of those tough ones, let it sit in there for 24 hours before you dump. Even if you’ve got to take it home and bring it to the RV dealer a day or two later after letting it sit in there. What that liquid is going to do is, it’s clean liquid, it’s going to just soften up all the material on the side of the tanks that may be giving us that false reading.
Now, on the rare occasion that doesn’t clean it out, you may need to add a new well nut or something on there. We do do that occasionally at the dealership. But those tricks that I’ve just shared with you, that gets it about 95% of the time. Hopefully, if you’ve got one of your tanks and you try my tricks, it’ll help you get that reading at empty so you can have an accurate, you know, know what’s going on in your tanks and know how full they are before you dump them. Really important with the black tank.
Once again, let it fill up as much as you can while you’re using the RV before you dump. This is going to help us evacuate the tank properly and can keep those tank sensors reading clean. And it’s also going to give the chemical enough time to break down the solids and break down the paper.
So use a lot of water if you can, if you’re not in a dry camping situation. If that doesn’t work for you and you still get a false reading, fill the tank up with water, let it sit for as long as you can before you dump. That should clear out. If it’s a real toughy, get yourself five gallons of hot water and dump it down that toilet. Let that sit around for a little while, and that’ll actually steam the sensors. And then you can go ahead and flush the tank really well. And you can try the products that I showed you earlier, the swizzle sticks and things like that.
So hopefully this helps you clean those tank sensors. Thanks again for stopping in, checking out our quick tips with Randy. And always check us out on our Facebook page, and we’d love to see you on the YouTube channel as well. Thanks for thinking of Pete’s RV and happy camping.
Pete’s RV Center is an exceptional dealership group serving the United States and Canada since 1952. With multiple locations, Pete’s RV provides sales, service, parts, accessories, and education to our community of RVers all across North America.
PetesRV.com expert, Randy Murray provides an overview of basic camping essentials and the tools required to make your next trip safe, worry free, and fun!
Video Transcript for “Basic Camping Essentials | Pete’s RV Quick Tips”
Randy: Hey, folks. Randy with Pete’s RV TV here today. Another Quick Tip segment for you. I just want to take a couple minutes and show you some of the things that I bring me … with me when I go camping.
I take a lot of phone calls from customers that have small problems while they’re camping that do arise. and when I direct them on the best way to take care of that problem, they need a couple tools that, they may not have with them. So, if you put together a basic tool kit, when you go camping, leave it right in the camper, no problem whatsoever. We can talk you through most anything.
So, some of the things that I bring with me is, first of all, I always bring some sort of, like, source. Either something I can put on my head, or … This little guy right here in kinda neat. We sell him in the store. It’s got a magnet on the back, so we can stick it to a piece of metal in the camper where I’m working there. It’s got a hook on it and it gives me some light underneath the cabinet or in the front storage compartment or by the battery, cause nothing ever goes wrong in the daylight. It always happens at night, especially if you go camping with me.
So, a couple lights, which are nice to have, or even if you’ve got just a regular flashlight that you store, and keep charge in the camper. Another thing I bring is I’ve got a bag of fuses. So, every fuse … every camper has multiple different size fuses in them. So, I kind of got a bag of … Just, a variety of everything that I run into in a camper and a good thing to have with me. Roll of electrical tape. Never know (laughs) and you can fix most anything with electrical tape, if needed.
I also bring some crimp-connectors, which you can buy in a kit like at, your local, home goods store or something like that. And these are just if I have to re-attach a wire, or we have to shorten something up, or we have a mishap or something pulled loose. Just, to be able to make a crimp connection is nice. That will also work in conjunction with a pair of crimping pliers. And, again, sometimes the kits you purchase will come with an inexpensive pair of pliers that you can use, to get by for the weekend.
Now, most campers are built with, screws, obviously. And the type of screws they use are a square-tip, or a screw had has got a square tip, so you need a special square tip, to go to those screws. And that’s this guy right here, if Josh can pan in on it, and you’ll see I got a Phillips right next to it.
most people have a Phillips, because that’s what we have at home. Campers are a little odd, and they require that square tip. So, this tip that I purchased from, again one of the local box stores. It’s a Milwaukee kit. I think it cost like $20. It’s got everything I need in it. It’s got, screw acceptor for my screw gun. You will need a screw gun as well. and it’s got the square tips, it’s got fill-ups, it’s got a couple torques here, and it’s got spares of all, because if you lose them like I do, nice to have a spare. But anyway, for the cost of this kit, I think it’s just a great kit to (laughs) … I have one at home, and on my carry-around tool box that I do bring with me when I go camping.
Sheet-rock knife, or a box cutter. This one actually folds up like a jackknife. I actually carry this one with me all the time, right in the pocket of my pants, but, good to have. you never know when you’re gonna need that. Wire-strippers, and cutters. Again, if we have an electrical problem … A lot of times, we can talk you through it, or you can find it very easily yourself, but having a good pair of strippers on board, it makes that job a lot easier for us stripping that wire back.
I like to bring a couple pair of channel locks if I’ve got a plumbing issue, and usually I can get by with a bind if I got to tighten something up with a channel locks. And again, this can be purchased at your local box store. Christmas is a great time to pick this stuff up because they’ve usually got kits on sale, relatively low price. And you don’t need the best ones. A lot of these tools are very expensive tools. This is how I make my living. You don’t need the best tools for your basic kit that you keep in your camper.
I usually will carry a Phillips and a regular screwdriver. These are like mid-size so they’re pretty much good for almost every application, unless it’s something specific. we’ve already talked about the crimpers. I do carry a pair of side cutters with me. Sometimes these are just a little easier to make a cut close to something or pull a staple out that may be in our carpet or what have you. But, again, pair of side cutters.
Needle nose. You can always get yourself out of a bind with a pair of needle nose. Especially, when you drop something in that spot that my little fat fingers can’t get into. Needle nose, it makes it very easy for that. there is some neat, small kits out there. Again, the big box store, Sears, all of them have kits that have couple different size open end box wrenches. This is one of the ones I carry in the small kit that I have that’s all over my toolbox cause I left it open. i also bring a couple of adjustable wrenches with me as well. Reason for the adjustable wrenches is, they’re adjustable. We can use them for almost any size, anything to get you out of a bind.
Again, these aren’t tools to, you know, fix the problem per se, but enough to get us by for the weekend before you can get it in for service and get it ap- repaired appropriately. an electrical tested. This particular one right here is for 120 volt power. Pretty much, I’m just going to plug it into the outlet and it’ll tell me if my power is good, tell me if it’s wired properly, and tell me if power is present. So that’s a good one. I take phone calls a lot where, “My TV’s not working.” “Well, do you have power at the outlet?” “I don’t know, Randy.” (laughs) well, I’m gonna- Having you plug something else in, but if you’ve got a quick electrical tester to plug it in, then you can tell me.
This guy right here is for checking 12 volt power. It’s called a stab tester, 12 volt tester. We’d hook this into ground or anything pretty much metal on the camper and then we can test our fuses with this guy here. I’m gonna have Josh pan in on one of these fuses here. This is a great way to test our fuses so if you can pan right in on that and see the two metal tabs on either side of the 40 there, Josh. Each one of those is a test point so I can test if I’ve got power coming in in the fuse and I can test if I’ve got power going out of the fuse.
So when you’re looking at a whole fuse panel and you’re trying to determine which one is the one for your furnace or your LP detector, something like that, which is labeled incorrectly, by testing both sides, as well as the fuses, we can quickly determine whether one is blown or not. And again, we would do that in conjunction with this tester here. This will also test if we’ve got power at breakers and things like that on the 12 volt side of things so when you call me up and tell me that your slide outs not going out, I’m going to ask you if you’ve got 12 volt power to the breaker going through the breaker to the slide out. This is a great way to test that.
This is another tester that I carry with me. Kind of [00:06:00] on the same lines of this one here, but I can actually put this next to any wire and it’ll tell if it’s 120 volt wire and it’ll tell me if I have voltage present rather than putting it into an outlet. It’s called a [wiggie 00:06:09] tester.
Multimeter. This is what I love for customers to have cause we can do all sorts of testing with this guy here. Not everyone’s gonna put this, in their tool box that they keep in their camper because these can be a little bit more pricey, but if you’ve got like an inexpensive version of this and one of these, which aren’t too bad, we can usually get by anything.
So anyway, there’s just some of the tools that I bring with [00:06:30] me camping and, again, enough to get you out of trouble in a pinch. maybe not make the final repair, but definitely continue on with your camping weekend if you are having a small problem. So, just wanted to share that with you guys and if you’re looking for presents for Father’s day, birthdays, or even Christmas, great time to put this little tool kit together and can be done for relatively, inexpensive on the Father Day, on the Christmas side of things, cause that’s when we see a lot of tools on sale at our local box store. So, thanks for watching Quick Tips with Randy today. look forward to seeing you on the road and happy camping.
Pete’s RV Center is an exceptional dealership group serving the United States and Canada since 1952. With multiple locations, Pete’s RV provides sales, service, parts, accessories, and education to our community of RVers all across North America.
Fifth Wheel vs Motorhome – Reasons to Consider a 5th Wheel Friday, May, 1st 2015 22:07:29
RV Lifestyle Consultant Joe Vartuli discusses before rushing into the decision of purchasing a motorhome and why you should consider: ton the five key points to take into consideration:
1. Interior Space/Ceiling Height.
Typically, fifth wheels provide more living space, especially if equipped with multiple slideouts. Slideout widths are generally smaller in motorhomes to allow for people to move about the cabin, which produces less living space. Also factor in large interior ceiling heights in fifth wheels, and you’ll feel more at home.
2. Furniture/Appliances.
Large size residential amenities provide that home away from home feeling, with optional items such as central vac, solid surface counter tops, and also larger AC units, heating systems, and appliances depending on the model of the fifth wheel.
3. Storage.
The combination of exterior and interior storage provides extra space to bring along any and all items. Because there is no engine or cabin, fifth wheels generally have large bulkhead storage for bigger sized items.
4. Towing vs Driving.
As Joe mentions, 80% of people end up towing another vehicle behind their motorhome, whereas with a fifth wheel you always have a dependable tow vehicle with you, allowing you to easily unhook and travel wherever you would like. Either way, you will be towing something.
5. Cost/Maintenance.
Insurance plays a key role in cost for owning a motorhome because there are more moving parts. A fifth wheel can be up to 30% cheaper to insure than a motorhome. Plus, you have to factor in all general maintenance items like the chassis, tires, wheel bearings, brakes, compressed air systems, hydraulic systems, oil changes, etc. Overall, maintenance costs will run higher for a motorhome vs a fifth wheel simply because of the mechanics and build.
As you can see there are many factors to determine whether or not a motorhome or fifth wheel is more suitable for you and your family. As Joe explains, fifth wheels will provide you with more livability, which is better for longer stays, and motorhomes may be better suited for quicker stop and go trips. We hope we shed some insight on the differences to help make your decision making more educated.
Pete’s RV Center is an extraordinary recreational vehicle dealer with locations in South Burlington, VT, and Schererville, IN. An RV sales and service provider since 1952, Pete’s RV Center carries an extensive inventory of Keystone, Crossroads, Coachman, Heartland, Evergreen and Forest River RV-branded campers. We can be reached at 1-888-902-9352.
Make sure to subscribe to the Pete’s RV YouTube channel for more informative videos and information on news and events.
Video Transcript | Fifth Wheel vs Motorhome – Reasons to Consider a 5th Wheel
Hi, I’m Joe Vartuli, RV Lifestyle Consultant, here at Pete’s RV Center in South Burlington, Vermont. I’m going to do a little bit of a buyer’s tip here. We’re actually doing a Fifth-Wheel versus a motorhome. I want to give you reasons why you should consider a Fifth Wheel if you were thinking you were in the market for a motorhome and depending on how you use it, how the Fifth Wheel can benefit you, alright?
some of the few things that we’re going to go over in kind of this quick video are interior space ceiling height. If you’ll notice, I’m in a triple slide right now. This has a tremendous amount of floor space in it. It has lots of storage everywhere. It’s all very usable. also, the ceiling heights are incredible in the Fifth-Wheels. The, no matter how tall you are, you’re not going to hit the ceiling. It’s, it gives you the feeling of space and openness, which a lot of people like.
a couple of the other things is the furniture. some of our units have very, very plush furniture in ’em. The Fifth Wheels, this unit here, in particular, has heated massage, theater seating, that actually has a power reclining in it. So it’s, it’s all right at your fingertips, LED lighting, and solid-surface counter tops. frameless windows on a lot of our fifth wheels, fireplaces, central vacuum systems if they don’t come with a, with a Dyson already.
also, Josh just showed you the full residential style of refrigerator, which is coming in more and more of the high-midline and upper-end Fifth Wheels. Big appliances. This one has a 30-inch, over-the-counter Microwave that you can see, and we are in a Bighorn 3875 so I will mention that. this is a, a front bathroom model, has a lot of great features.
But back to what we were talking about, otherwise I’ll keep rambling. storage. You notice the cabinetry everywhere inside of here. So inside and out, Fifth Wheels give you a tremendous amount of storage. On the outside, you have pass-through [store 00:01:59] [00:02:00], which we can’t show you here, but tremendous pass, pass-through compartments. Drills, chairs, blocks, whatever you need to put in there, even a small refrigerator will fit in some of the the outside storage compartments on these units. So you can bring everything with you. All right?
Towing and driving. One thing with a Fifth-Wheel is you’re only going to have one motorized vehicle. 80% of motorhome b-, motorhome buyers will end up towing a car, maybe a trailer with a motorcycle in it, but they end up towing something.
This, you have a nice tow vehicle with you all the time, so you always have a good dependable vehicle. once you’re unhitched at the campground you go to, state park, wherever you are, you have a reliable unit that you can go anywhere with.
next thing is cost and maintenance. Insurance cost on this is, is a fraction of what a motorhome would be. So it’s, it’s a third of what an average, maybe even a gas-class A would be. maintenance is very simple because it’s not another motorized vehicle.
You have your roof system to take care of, you keep it clean, you have your brakes and your, your axles. You keep your bearings lubed. And that’s not a whole lot more that you need to do with a, with a camper. A few other small items, but with another motorized vehicle, you have the class, you have the oil changes, the transmission fluids. You have a whole other motor vehicle that you have to take care of. And the ins-, like I said, again the insurance is a big part of it. There is a lot more.
Also going back a little bit to the towing, if you have the right-sized pickup, mated to the Fifth Wheel that you want, you back in, you drop your tailgate, you stop into your hitch, you put up your power legs and away you go. It’s very, very simple.
a lot of people ask me when they come in during the week, you know, I, really want a motorhome because it’s, it’s because I want to move a lot. We want to be going every one or two days here and there. It w-, the motorhomes will work terrific for that.
That being said, if you want to do extended stays at any point, the Fifth Wheel gives you much more livability in it. it will give you more space, more storage. Some of them have two bathrooms. bigger furnace systems, bigger air-conditioning systems until you get into your really high-end level diesel pusher motorhomes.
In a lot of ways, we’re trying to tell you the Fifth Wheel will give you a great option if you’re willing to look at it. I hope you enjoyed this buying tip from Pete’s RV. My name is Joe.
Pete’s RV Center is an exceptional dealership group serving the United States and Canada since 1952. With multiple locations, Pete’s RV provides sales, service, parts, accessories, and education to our community of RVers all across North America.
How to Properly Use The Air Conditioner in Your Camper
Wednesday, July 3oth 2014 20:03:48
Learn All About Using Your Campers Air Conditioning on the Pete’s RV YouTube channel.
Randy gives a quick important lesson teaching us that air conditioners work by removing warm air and moisture from around the room, which then gets sucked outside leaving the room cooler.
In order to make sure your AC is running properly, Randy shows us how to remove and check the air filter to make sure there isn’t a buildup of dirt and dust hindering performance. Making sure the fan is on will increase efficiently with the AC system, as well as making sure that all doors, windows, and shades are closed to prevent heat from working its way back inside the camper.
Randy advises turning on the AC when temperatures are cooler (typically early morning) for optimal air flow and a cooler camper throughout the day. By using the quick cool option to restrict airflow from the ducts, the AC can effectively cool the room faster and when it reaches a temperature to your liking, airflow can be redirected back through the vents for everyone to enjoy.
To learn more from Randy and stay up to date on all things Pete’s RV be sure to visit and subscribe to our YouTube channel.
Video Transcript | How to Properly Use The Air Conditioner in Your Camper
Randy: Hey guys, Randy with Pete’s RV TV today, another quick-tip segment for you. Today I’m going to talk about air conditioners and the proper way to use them. I’ve been taking a lot of calls around the country and we’re in the middle of our warm season in Vermont, the little warm season that we get up here in the northeast. But people are having trouble with their air conditioners freezing up. People are saying they’re not cooling properly for them. And sometimes that’s the case, but usually it’s operator error about 99 percent of the time.
When I went to RVIA school back a million years ago when I first started in the industry and got certified to do this kind of stuff, one of the first things they taught me about air conditioners is they don’t make cool. They remove heat and they remove moisture, as well. cool just happens to be a byproduct.
So, when we allow our coach to heat up inside, we go to the pool all day, we’re out shopping or doing, visiting the sights around the area and we’ve got the air conditioner off, we go back to our camper at 5 o’clock at night. It’s 100 degrees inside the camper. We turn that air conditioner on. That air conditioner actually has to pull the heat out of the carpet, out of the bedding, out of the couches, out of everything inside before we start to feel cool.
So what I want you to do is I want you to do is turn that air conditioner on in the morning. it’s a little bit cooler at night, so when it’s a little bit cooler at night, of course, the coach stays a little bit cooler. So when you get up in the morning set that thermostat at about 65 degrees, 67 degrees. Let’s maintain that cool from the night before. Now, if we never let our coach heat up, the air conditioner is going to have to work a lot less hard to maintain that cool and we’re actually saving energy.
The other thing that we want to do with our air conditioner, too, is while we maintain it while we’re using it is we want to make sure that the filters are clean. So we can remove that very easily on this guy here and we just want to take this guy out and make sure it’s vacuumed. If it starts to turn brown that usually means there’s a lot of dust.
Another thing that makes an air conditioner work very effectively for us, or makes them work better, is more air flow. So with a clean filter we can get more air through this air conditioner, especially on those [00:02:00] hot, humid days.
the other thing we’ll, we’ll want to do is we want to set our fan on high. I usually use the auto setting on mine, if you let the air conditioner run all day. Again, the more air that we’re moving, the more heat we can take out of the coach and expend outside and put the cold air back inside the coach. So fan definitely on high.
We also want to make sure our doors and windows and vents are closed. I went to a camper on a campground the other day. A lady says, “My air conditioner is not cooling very well. Can you take a look at it?” I went inside. I put my hand up to the air conditioner, it was cooling just fine. What she had was both of her doors were open. She had some vents open, a couple windows open. So what that air conditioner was doing was pulling the heat from the outside and just getting rid of that and returning it so it could never bring the temperature of the coach down because it was just kind of maintaining.
What these guys will do is they’ll actually do about a 20-degree air differential, air temperature differential. So, it sucks in here, blows out here or out through our vents, and it’s going to be about a 20-degree differential. Now, if it’s just pulling air from a door, it’s never going to really bring the temperature of the coach down, so make sure all windows and doors and vents are closed. and again, that high air flow moving through the air conditioner is going to get that heat escape faster and help us with freeze up a little bit, too. The moisture will actually pass over the evaporator coil a lot quicker and not have a tendency to grab on there.
Another thing, we just got to our campgrounds, its 5 o’clock at night, we’ve been traveling all day, inside the camper it’s very hot because it’s a hot day out, so you got to turn your air conditioner on to cool this guy down. Instead of forcing it through the vents, if you’ve got a ducted air conditioner, open up the quick-cool option. This way we’re going to get a lot of airflow and we’re going to cool the coach down a little bit quicker.
Once we bring the temperature down, we can go ahead and close this and we can go through the ducts. The ducts are going to restrict the airflow a little bit, but once we bring the coach down the air conditioner is running efficiently, then we can go ahead and put it through the vents in the ceiling.
So if you try out my quick tips here, run it on high, set it in the morning, let it run all day to keep that cool inside so we don’t have to remove all that heat from building up in the sun all day. Also, if you can close your shades and things [00:04:00] like that, keep the UVs down, that’s going to help out a lot as well.
But all these should help you make your air conditioner work a lot more effectively for you. Save a phone call to me and just have a better camping experience, keep you guys cool. Now, out there having fun, you get hot, you want to come into a cool area, at least I do, and it makes it a lot more fun when you’re drinking a soda or whatever while you’re watching TV, as well.
So thanks again for watching Pete’s RV with Randy today. keep an eye out for our quick tips. Join us on our Facebook page. Sign up [ 00:04:26] on Youtube and happy camping (laughs). Have a great one.
Resident RV Expert Randy Murray delivers on a crucial RV question via the Pete’s RV YouTube Channel, “What is the importance of slide toppers (aka slideout awnings)?”
When it comes to protecting the vitality and value of your RV, slideout seals found around the slide are the lifeline to the health and well-being of your camper. As Randy explains, if you compromise or damage those seals then you risk water potentially penetrating into the camper provoking damage over time.
Randy presents a prime example of just how well slide toppers can defend your camper after a weekend at the campground. Sprinkling a box full of debris on the slides to simulate a weekend of buildup, you can clearly see that everything rolls off as the slides are brought in.
A highly-affordable investment, slide toppers can save RV owners thousands of dollars in repairs! For just a few extra dollars a month, their installation can be built right into your new RV payment plan.